Our editors independently select these products. Making a purchase through our links may earn Well+Good a commission
If you’ve been scrolling through Instagram searching for a holiday manicure that doesn’t scream Santa, snowflakes, or bows, you aren’t asking for too much. Maybe what you’re looking for is a gold chrome nail design? Gold and chrome have both been cool (when used separately or together) on nails. Still, after seeing Beyoncé and her daughter Blue Ivy rocking various iterations of gold chrome nails done by their nail artist Miho Okawara, at the recent Mufasa: The Lion King premiere in Los Angeles, we were reminded how much we love playing with the metallic hue (especially during the holiday season).
Unlike traditional red holiday manicures, gold chrome gives a luxe finish that is edgy but still super timeless. The best part is? You’ve also got a lot of options depending on your personal style. From intricate 3D art to subtle French tips, we’ve rounded up some of our favorite gold chrome nail looks from the web, so all you have to do is screenshot and share with your nail artist (or DIY if you’re up for it).
1. All over shine
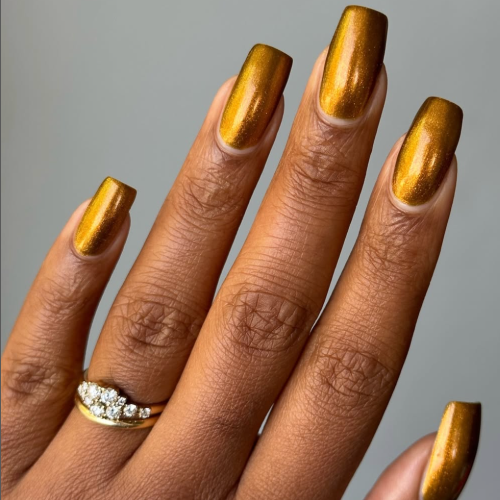
Opting for a solid shade of chrome gold is universally flattering and complements both warm and cool undertones. Nail artist Melanated Mani used the shade Fool’s Gold from Death Valley Nails ($15) for this all over wash of color.
2. Golden French tips
A gold chrome French tip offers a fun twist on the classic manicure. Using a more saturated gold polish like OPI’s Metallic Mega Mix in Saturn Me On ($12) will help make the tips stand out.
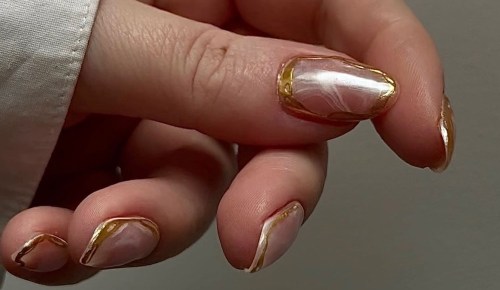
3. Marble-like swirls
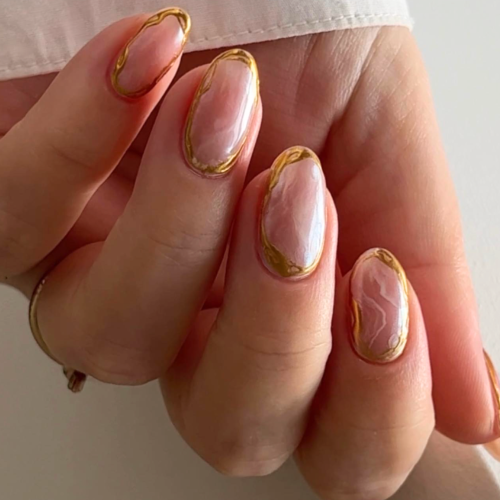
This milky-marble design caught our attention. Nail artist Jen Seales used chrome nail powder to create this effect, similar to this OPI Chrome Effects Mirror Shine Nail Powder ($14). We suggest a neutral base to really let the gold stand out.
advertisement
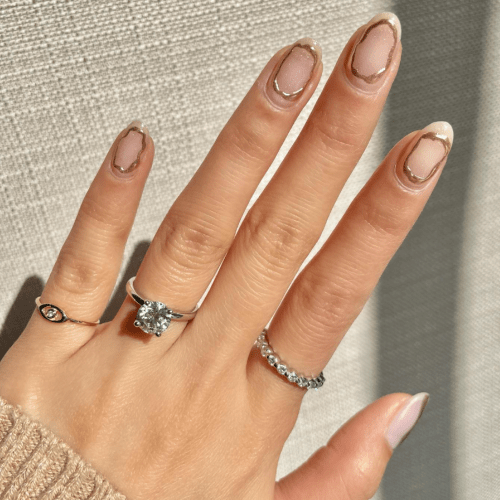
4. Golden perimeters
We love the detailing of this manicure and how nail artist Amy Tran uses metallic gold chrome to create a perimeter around the nail bed. You can easily and quickly create this design with these 5D gold embossed nail art stickers ($6) from Amazon.
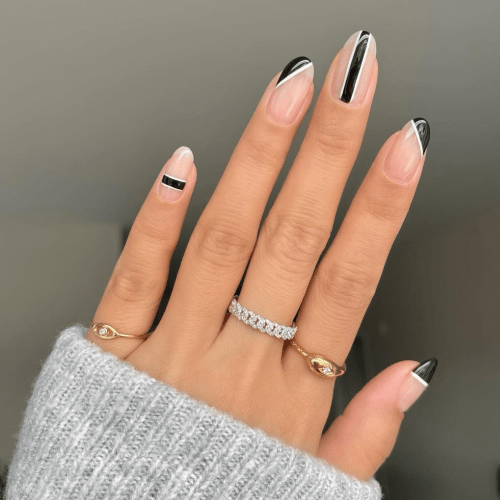
5. Striped details
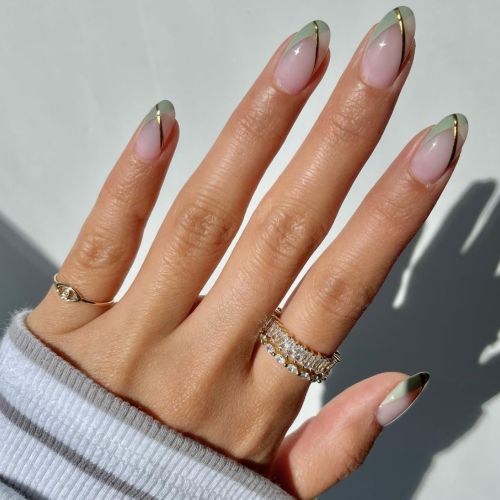
Create subtle gold detailing to any manicure using a gold chrome mirror liner, like this thin-brush gel polish ($7) from. Your design options are endless—you can go for something subtle, like simple lines, or more intricate like a full on design. We suggest using complementary colors that will make the gold stand out.
advertisement
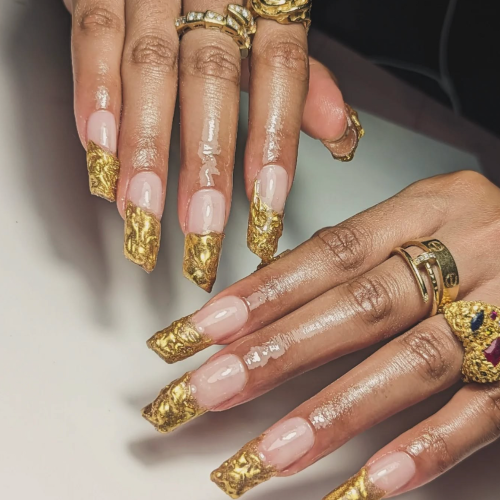
6. 3D art
For many, this edgy 3D manicure requires a salon visit. But we found some user-friendly products to help create this look at home. Grab this 3D nail gel from Amazon ($7) to create designs without the mess. It will require a LED nail lamp to cure the look, but once its on your nail art won’t budge.
Sign Up for Our Daily Newsletter
Get all the latest in wellness, trends, food, fitness, beauty, and more delivered right to your inbox.
Our editors independently select these products. Making a purchase through our links may earn Well+Good a commission
If you’ve been saving that “for special occasions” sparkly topcoat, Valentine’s Day is calling. But this year’s manicures are giving us elevated takes on traditional sweet designs. The latest trends lean into subtlety, like gossamer-thin heart outlines floating on neutral bases, rose gold chrome, and gradient pinks. Even classic red nails are getting a modern upgrade with velvet-matte finishes and unexpected negative space designs. Whether you’re a minimalist who prefers your romance understated or someone ready to embrace full-on glamour, these nail looks prove that Valentine’s Day manicures can be both festive and chic. The best part? Many of these designs work well beyond Valentine’s Day, making them as practical as they are pretty.
advertisement
1. Matte love
A simple red manicure looks elevated when topped with a matte finish and detailed with negative space hearts. Choose your favorite bright red polish, then swipe on a matte top coat (like this pick from OPI, $11), and use self-adhesive heart decals to shape out the heart. Grab this set for $6 on Amazon.
2. All over red
All over red is simple yet stunning when it’s mixed with bits of sparkle. We love this manicure idea because it’s ideal for Valentine’s Day, yet carries over well into the year. Red nails are the equivalent to a little black dress—always in style. To create this look, we recommend Zoya Nail Lacquer in the color Sophia ($12).
3. Whimsical details
Valentine’s Day is the perfect excuse to explore pink and red designs; it is canon, after all. If you have the patience (and skill) to manually draw on intricate designs, reach for this gel liner set ($30) in a multitude of colors to DIY the effect. If you don’t have the patience to hand paint yourself, we’ve got you covered—try these heart press-ons from Amazon ($6) for an easy way to whimsy up your tips.
advertisement
4. Black and white borders
Frame your manicure with a dotted black and white edge. While this design might look like it requires a salon visit, you can easily DIY this (trust us!). Start by coating your nails in a neutral shade, then create a delicate heart centerpiece (for ease, you can use a heart decal). Complete the design by carefully placing alternating black and white dots along the perimeter using a precision dotting tool, like this one from Sally Hansen ($7).
5. Pretty in Pink
Why choose one shade of pink when you can rock them all? We recommend the Eternal Pink Nail Polish Set, ($22) so you can choose from five different shades of pink without having to buy separate bottles. Draw on hearts in an alternate shade, swipe with your favorite clear top coat, and you’re ready for the most amazing Valentine’s Day.
advertisement
6. Pink and white hearts
Nail artist Amy Tran used a sugar glaze base coat from Kokoist USA ($17) and then manually drew on pink and white hearts. If you don’t have a steady hand (guilty!) you can use this 3D nail art pen set ($10) from Amazon to easily create hearts, or whatever shape you desire.
7. Red on pink
Whether paired with glitter, combined with other romantic motifs, or kept clean and classic, heart nail designs remain a classic for Valentine’s Day. For this look, swipe a rich pink hue over your nails (we adore this OPI polish in the shade Makeout-side, $12) and then use a darker shade red to draw on hearts. To make it easier, use these heart-shaped stencils from Amazon ($7) for a faster design.
8. Gel finishes
Nail artist Sam Rose mixed shades of pink and dotted them on her nails using a tool like this from Londontown, ($12) and then topped each nail off with a gel finish. The result? A mesmerizing marble effect that is perfect for a Valentine’s night out. We especially love rhinestone details spread throughout for a nice finishing touch.
advertisement
9. Black French tips
Black French tips are always a vibe and for Valentine’s Day, they are an unexpected yet chic look. Nail artist Stacey Lowrie meticulously hand painted each tip, but if you don’t have time to hand paint, you can use Glamnetic’s press-on nails ($15) in the color caviar and delicately draw on red hearts on each of your ring fingers.
10. Candy hearts
These nails are certainly a conversation starter. They may look difficult to pull off, but nail artist Sam Rose shares that she simply used candy heart nail stickers to pull off the look, and finished off with a clear top coat. Try this $10 set from Amazon to DIY the look yourself.
advertisement
11. Croc prints
Elevate a pink nail by adding some texture. We love this croc-like effect with subtle curves to give the nail a wild and animalistic feel. To create this look, simply swipe with a clear gel top coat, and then use a pink gel polish (like this one from Olive & June, $10) to create dots along the nail bed. Once complete, cure your nails under an LED nail lamp and then swipe again with a clear gel top coat.
12. Gradient pink heart tips
Go the extra mile with your tips my transforming them into hearts. Nail artist Marnie meticulously drew each gradient heart on her tips using nail liners like these from Amazon ($5). She then topped each nail off with a holographic top coat polish. We recommend this Mermaid Effect Top Coat from Olive & June ($9).
advertisement
13. Marble effect
We love pink nails with a twist. This marble effect is courtesy of a blooming gel, like this one from Red Carpet Manicure ($11). Simply apply a base coat, swipe on your favorite gel pink polish, cure your nails under an LED nail lamp, and then apply the blooming gel.
14. Purple details
This mani was hand painted using nail liners , but if you don’t have the patience (or steady hand) to draw on cute bow designs, reach for press-ons. This pink press-on set ($12) is crafted with a texture and shape closely resemble natural nails and includes pink bows and dots that are fun enough for Valentine’s Day and beyond. Looking for something more colorful? We adore this set priced at just $7.
15. Flaming heart milagros
A flaming heart milagro represents love and healing, so Valentine’s Day is the perfect time to rock these symbols on your nails. These powerful Mexican folk charms take on new life when transformed into delicate nail designs. We love Latina-owned Reina Rebelde because the brand perfectly captures the vibe with its thoughtfully crafted milagro nail decals ($10).
advertisement
16. Queen of hearts
Dress up your classic red mani by creating an upside-down heart that extends up the nail bed. Use a neutral shade as a background to really make the red pop, and then finish off the look with rhinestone details. We recommend this rhinestone kit from Half Magic ($18).
17. Cherries on top
If you’re not a hearts and candy type of person, then go for an different vibe with vibrant red cherries. Set against a classic French manicure, ruby red cherries are drawn on hanging from green stems. If you don’t have all day to spend time on your Valentine’s Day nails, we suggest using cherry nail stickers, like this set from Amazon ($9).
advertisement
18. Abstract swirls
Channel your inner artist and draw outside the lines. Paint any type of abstract design you like for a unique spin on Valentine’s Day nails. For help creating the look, use a nail art brush set, like this one from Olive & June, ($16) paired with your favorite red, pink, and purple polishes.
Sign Up for Our Daily Newsletter
Get all the latest in wellness, trends, food, fitness, beauty, and more delivered right to your inbox.
Our editors independently select these products. Making a purchase through our links may earn Well+Good a commission
I go through an acrylic nail phase once every few years. Usually, it’s immediately following a nail-biting phase—acrylics are my go-to hack for saving me from myself, giving my natural nails time to grow back while hiding my shame under an immaculate manicure.
The tedious part I always wished I could skip? The removal appointment. Of course, the one time I did skip it and DIYed my acrylic nail removal, I regretted it—this was a long time ago, as in early-days-of-Googling long time ago, so my technique was some combination of the wrong tools and brute force. It took my natural nails months to recover.
My lesson: don’t try this at home. Nail artists agree that leaving it up to the pros is the safest way to go. But that’s not why you’re here, reading this with zero intention of going to a nail salon to remove your outgrown acrylics. So we asked a nail artist and a dermatologist specializing in nail health: If we’re going to remove our acrylics at home (just this once and never again, we swear)—what is the best way to do it?
Optional: Nail-strengthening base coat if you plan to add polish after removing the acrylics
How to remove acrylics at home, step by step
You’ve got the supplies. What next?
“I highly recommend going to a salon for all acrylic removal, but in emergency situations, I prefer to file off most of the acrylic and then soak off the remaining thin layer of acrylic off the nails with acetone,” Herman says. Here’s how to do it:
advertisement
1. Use a lower grit file of 100-150 to remove the bulk of acrylic, leaving a thin layer on your natural nails. This will prevent you from accidentally damaging your natural nails.
2. Rub a little cuticle oil into the skin around each nail. We love Cuccio’s Revitalizing Cuticle Oil, which has safflower oil and vitamin E to hydrate dry cuticles without a greasy finish.
3. Soak a piece of cotton with an acetone-based nail polish remover and place one on top of each nail.
4. Use a piece of foil to wrap around each finger, covering each cotton ball.
5. With the foil secured around each cotton ball, sit back and wait until the acrylic gets soft and crumbly—about eight to 15 minutes.
6. Once the acrylic has softened, gently scrape the acrylic off each nail with an orange stick or cuticle pusher.
7. Once your nails are bare, apply a nail repair or strengthener product to your natural nails and cuticle oil to your cuticles. Herman likes Olive & June’s nail strengthener, which boosts nail strength by 77 percent.
8. If you’re putting on nail polish afterward, start with a strengthening base coat. Herman recommends Maxus’ base coat, made of silk amino acids that strengthen the nail plate and improve nail hydration to prevent brittleness. She also likes Essie’s Good as New Nail Perfector, which will give you a pop of that classic Essie sheer pink while instantly providing evening texture and improving natural nail surface in one week.
Taking a break between acrylic nail appointments
The hard truth about nail enhancements like acrylics is that you should, ultimately, take breaks to preserve the health of your nails. “Inevitably, if you are an acrylic fan, post-acrylic rehab is needed,” Dr. Stern says. “Just like you need to take care of your skin for your makeup to perform optimally, the same is true for the nail.”
To ensure your natural nails are in tip-top shape between acrylic manis, Dr. Stern recommends giving your nails a break with products that remove damage and effectively hydrate and strengthen. A regular break with extra TLC can go a long way in keeping your natural nails healthy. “Prolonged acetone soaks can lead to considerable dehydration to the nail and surrounding cuticle and nail fold, leading to brittleness, dry cuticles, and hang nails. Another risk of acrylics is that in the process of removal, you may inadvertently remove some of the superficial layers of nail cells, causing a keratin granulation,” she explains.
advertisement
How long should you give it? The pros at Sally Beauty recommend every two to three months, but keep an eye on your natural nails. If you notice thinning or breakage, you might benefit from more frequent breaks. DIYing removal instead of going to a pro also ups the odds that your natural nails will sustain some damage and require downtime. So take it slow, never tug or pull at your acrylics, and go easy on the file—the more overzealous you are, the more likely you are to damage your natural nails.
How to treat care for your nails after removing acrylics
When it’s time to treat your nails between acrylic appointments, Dr. Stern recommends the Nail Renewal System, a three-step treatment she developed for strengthening nails and repairing damage. The Nail Renewal weekly treatment consists of a glycolic prep for chemical nail exfoliation, a gentle nail buffer to remove damaged nail cells, and a nourishing gel oil that acts as a moisturizer, nail strengthener, and cuticle oil.
(And doctor’s orders: always take a break from acrylics, gels, and any nail polish before your annual dermatologist appointment—keep your fingernails and toenails bare for those, so you’re not inadvertently masking a health issue.)
The bottom line
You know what we’re going to say: ideally, leave acrylic nail removal to the pros. But nail emergencies are real, so if you’re going to remove them yourself, do it right. Take it slow, never tug or pull at your acrylics, and go easy with the file— the more overzealous you are, the more likely you are to damage your natural nails. And don’t forget to give your nails TLC between acrylics, no matter who removes them.
Sign Up for Our Daily Newsletter
Get all the latest in wellness, trends, food, fitness, beauty, and more delivered right to your inbox.