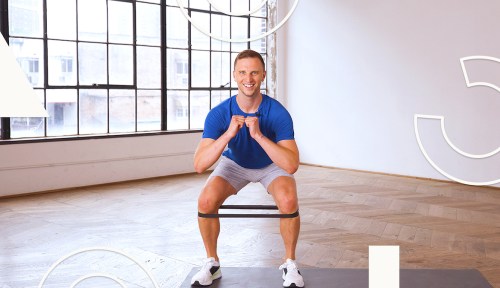
Of all the fitness accessories available, the resistance band has got to be the most versatile. Increase or decrease the tension, wrap it around yourself or something external, pull the band fast or slow. These simple pieces of latex (or fabric, if that’s your jam) can give you a strength workout that’s low impact but highly effective, and that—a lower body resistance band workout—is what we have for you today.
Experts in This Article
certified personal trainer and signature guide at KINRGY
fitness trainer and founder of Le Sweat
board-certified sports specialist and physical therapist based in San Francisco
In the latest episode of Well+Good’s Trainer of the Month Club, Lululemon Studio trainer Lonnie Poupard takes us through a 10-minute routine focused on building strength in the lower body and bringing stability to our hips and knees. Throughout, the resistance band will help you engage the muscles that surround these joints and fortify other tissues within the joints, bringing more support to your everyday movement.
Training with a resistance band
“Resistance bands work by offering an external force to the muscles without having to lift weights,” Alissa Tucker, CPT, CES, the master trainer of AKT, previously told Well+Good about using resistance bands. “Like lifting weights, resistance bands can help to improve muscle endurance and strength, and strengthen connective tissue in the joints.”
All you need to get started for this particular workout is a mini band, which is a small resistance band loop. Mini bands come in a variety of resistances, usually designated by color. You’ll want to choose a resistance level that challenges your muscles, but still allows you to complete the movements.
“Choose a band level that is challenging, but that you can move through your full range of motion,” Tucker says. “Because of the increase of intensity as you reach your full range of motion, a tendency can be to limit and not move through the full range.”
Tucker advises having multiple resistance levels on hand.
“If you’re not sure which level band to choose, we always recommend grabbing two,” Tucker says. “You can start with the heavier band and if/when you feel your form start to slip or that you’re cutting your range of motion short, switch to the lighter band.”
Most important is that you don’t choose a band based on what you think you should be using, but rather one that will be challenging, but still doable. Whether it’s “a little lighter, a little heavier, you pick what is right for you,” says Poupard.

Gaiam Restore Mini Loop Bands 5-Pack — $15.00
Run Smarter, Not Harder: Nike’s Running Shoe Finder Takes the Guesswork Out of Choosing Sneakers

Flares! Wide-Legs! Cargos! Here Are 5 Nike Pairs to Help You Celebrate the Active-Pants Renaissance

These Leggings Give You a Lymphatic Drainage Massage While You Walk—Here’s What Happened When I Tried Them

How a resistance band can improve your mobility
When we think of improving mobility, many people focus on stretching. But improving our mobility is actually about making sure our joints can work through their full range of motion while under tension—which is something a resistance band can help out with.
“Mobility is about control and working through full ranges of motion joint by joint, typically under tension or by creating tension,” trainer Charlee Atkins, CSCS and founder of Le Sweat, previously told Well+Good about mobility workouts.
Not having access to that range of motion can cause imbalances in other parts of the body. For example, immobile hips can lead to lower back pain. If you have knee pain, your problem might actually be limited knee mobility.
Strength is another key ingredient to preventing pain. If you have weaker glute or hamstring muscles, that can cause a chain reaction throughout the back.
“Anything that affects how well these muscles function, like joint mobility, weakness, or injury, may play a role in how efficient the low-back muscles work too,” Leada Malek, DPT, CSCS, previously told Well+Good about mobility and back pain relief. “If the hamstrings and glutes aren’t helping to distribute the load, then more will be placed on the low back.”
That’s why working on mobility and strength together makes for the perfect combination, and is something Poupard incorporates in this new lower body resistance band workout. Exercises like clamshells will build your glutes while challenging the range of motion of your hips to open up to their full potential against the resistance of the mini band. Banded walks and leg lifts will engage your quads as you work to keep your knees from bowing in, supporting that joint.
You can do the workout by following along in the video above, or by completing the exercises below on your own time. Find the right mini band for you, and get after it!
A 10-minute lower body resistance band workout
Format: Four bodyweight warmup moves, followed by four mini-band exercises, rounded out with a hip mobility challenge.
Equipment Needed: One mini band (a circular resistance band), or two if you are unsure which resistance level to use.
Who is this for?: Anyone who wants a quick lower-body workout that also benefits their hip and knee joint stability.
Warm-up
1. Good mornings (30 seconds)
- 1.While standing with feet hip-distance apart, place hands behind head and bring a slight bend to your knees.
- 2.Bend over so your torso is parallel to the floor, pressing your hips back and creating a stretch in your hamstrings.
- 3.Stand back upright and repeat.
2. Bodyweight squats (30 seconds)
- 1.Begin in the same standing position with hands behind head and feet hip-distance apart.
- 2.Bend knees and lower bottom into a squat.
- 3.Stand back upright and repeat.
3. Butt kicks (30 seconds)
- 1.Jog in place.
- 2.Exaggerate the movement of the legs by bringing your foot to your bottom and swinging your arms.
4. Jumping jacks (30 seconds)
- 1.Begin in a standing position.
- 2.Jump your legs apart while bringing your hands overhead.
- 3.Return to the starting position and repeat.
Now, grab your mini bands and let’s get into the meat of the workout.
5. Mini band walks (30 seconds)
- 1.Place a mini band around your lower legs just above the ankles.
- 2.Start with your feet hip-distance apart, lower into a slight squat with your but behind you, and brace your core.
- 3.Take a step out to the left with your left foot, then bring your right foot in so they’re hip-distance apart again. Keep tension in the band the entire time.
- 4.Repeat three times in one direction, then go the other way.
6. Mini-band leg lifts (30 seconds per side)
- 1.Begin in a standing position with feet hip-distance apart and the mini band just above the ankles.
- 2.Lift your right foot straight out to the side.
- 3.Bring it back in slowly and with control.
- 4.Repeat for 30 seconds.
- 5.Repeat on the other side.
7. Mini-band squats (1 minute)
- 1.Bring your mini band to just below your knees.
- 2.Begin in a standing position with hands behind head and feet hip-distance apart.
- 3.Bend knees and lower into a squat.
- 4.Press the knees out to resist the force of the mini band.
- 5.Stand back upright and repeat.
8. Clamshells (30 seconds per side)
- 1.Either remove the band or place it above your knees.
- 2.Come down to the ground and lie on your left side, with your knees bent, resting on your left elbow.
- 3.Keeping your feet touching each other, raise your top (right) knee.
- 4.Return to starting position, and repeat for 15 seconds.
- 5.For the final 15 seconds, keep your top knee raised, and only lower it down in small pulses.
- 6.Switch to the other side and repeat the series.
Repeat moves 5-7, before one final balance and mobility challenge, sans mini band
9. Hip rotations (1 rep per side)
- 1.Come into a standing position.
- 2.Lift your right leg bent out in front of you, so you are balancing on your left leg.
- 3.With a bent right leg, open your right knee out to the side.
- 4.Bring the leg around to the back and rotate the foot behind you so your knee comes down to meet the other knee.
- 5.Return the foot to lifted position, bent in front of you.
- 6.Reverse that circle in the other direction.
- 7.Repeat on the other side.
Sign up for the Well+Good SHOP Newsletter
Get exclusive deals on wellness, beauty, fitness, and food products that have been hand-picked by our editors.
Got it, you've been added to our email list.


