Welcome to Trainer of the Month Club, our brand-new fitness series, where we tap the coolest, most in-the-know fitness leaders to create a month-long fitness challenge. On Mondays, we have our “sweat drops” where you’ll get access to the week’s workout that you can follow along at home. This week, Kimmy Kellum from East River Pilates is taking us through a full-body Pilates workout.
Here’s a fun fact: You don’t need a fancy megaformer—or even a studio—to get a body-burning Pilates workout. In fact, all you need is a mat, a ring, and the willpower not to give up when the movements light your core on fire.
In this week’s edition of Well+Good’s Trainer of the Month Club, Pilates instructor and founder of East River Pilates Kimmy Kellum shows us how to get a full-body burn with nothing more than a Pilates ring. “Let’s be honest: It’s one of our most loved and hated props, because it’s so intense,” she says. “But it’s super effective.”
Pilates rings make you the creator of your own destiny. You can decide how quickly you want to do the moves (the slower the better), and how hard you want to press the ring (the harder you press, the more you engage your muscles). But one thing that every (Pilates) body needs to think about? Their form.
In order to get the most out of the moves (and avoid injury), you want to be sure you’re holding yourself in a neutral spine throughout your workout. “You want to think of holding a juicy peach under your chin,” says Kellum. Imagine that your bottom rib is trying to be heavy into the mat, but lift your lower back up just a little bit—”kind of enough room to put a blueberry under there.” So before you start into your exercises, take a moment to tuck and release your pelvis a few times to help you settle into neutral spine, which is somewhere in between those two positions.
Got that? Now follow along with the video to master the moves below, and don’t forget to check back next week when an all new trainer of the month will be sharing her stuff.
Obliques
Do the entire series on your right side, then repeat on your left
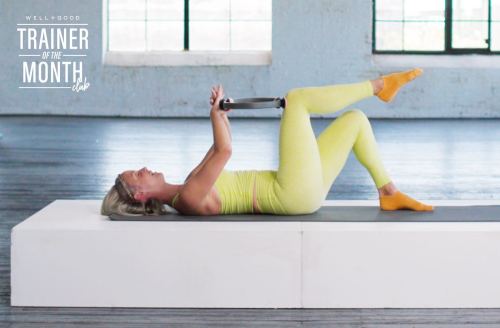
1. Thigh press: Lying on your back with a neutral spine and your right foot planted, float your left leg into table top—think about creating 90-degree angles at your hips and your knees. Push the ring up against your thigh with your elbows wide, and think about pushing it like a gameshow buzzer. As you exhale, hug your abdominals toward your spine and press the ring. Inhale to release. Repeat five times.
2. Thigh press with curl: Pressing the ring into your thigh with wide elbows in the same single-leg table-top position, take a deep breath and curl forward on the exhale. Inhale to lower back down to the floor. Repeat five times.
3. Thigh press with arm press: Pressing the ring into your table-topped left leg, keep your shoulders curled off of the floor and pulse the ring into your thighs, thinking about firing up the muscles in your arms. Repeat five times.
4. Criss-cross single leg extension: Pressing your opposite elbow or forearm against the ring and into your table-topped left leg, curl up and rotate your spine as you exhale. Keeping your low back lifted, float your right leg to meet your left in table top and hold. Extend your right leg out to hover, and bring it back to table top, pushing the circle into your left thigh the entire time. Repeat five times.
5. Criss-cross lift and lower: Holding your curl and pushing your ring into your table-topped left leg, lift and lower your right leg up and down with toes pointed. Repeat five times.
Glutes
1. Bridge with articulation: Start in active rest with your feet flat on the floor, knees bent, and spine neutral. Place the ring in between your thighs, and start to squeeze it—initiating with your abs, not your glutes. Then, squeeze your butt as much as you can, and lift up into a bridge. Lower back down to the floor. Repeat five times.
2. Bridge with inner thigh squeeze: Holding your bridge—ideally keeping your hips in alignment with your knees, chest, and shoulders—squeeze the rings with your thighs. Squeeze with both sides evenly. Repeat five times.
3. Bridge with right inner thigh squeeze: Holding the same position, squeeze the ring only with your right inner thigh. Repeat 10 times
4. Bridge with left inner thigh squeeze: Holding the same position, squeeze the ring only with your left inner thigh. Repeat 10 times
5. Bridge without articulation: Slide your legs through the ring, lower your feet to the mat and hold it behind your knees (widen your feet as much as you need to to keep it in place). Press into the circle evenly with each thigh, squeeze your glutes, and lift your butt into a bridge. Lower down into the floor, resisting the ring the entire time. Repeat 10 times.
6. Bridge with outer thigh squeeze: Holding your bridge, press out evenly into the ring with both thighs. Release. Repeat 10 times.
7. Bridge with right outer thigh squeeze: From the same bridge pose, press out into the ring using only your right thigh. Release. Repeat 10 times.
8. Bridge with left outer thigh squeeze: From the same bridge pose, press out into the ring using only your left thigh. Release. Repeat 10 times.
Don’t have a ring? Try this 9-minute equipment-free core workout, or this Pilates series that you don’t even have to stand up to master.
Sign Up for Our Daily Newsletter
Get all the latest in wellness, trends, food, fitness, beauty, and more delivered right to your inbox.
Got it, you've been added to our email list.
