Staying up in a handstand is a challenge on its own, but getting upside down in the first place is no small feat. You’ll have to engage your arms, back, and lats for your base, while also using the strength in your core, glutes, and quads to actually hoist those legs overhead.
Elisabeth Akinwale, CPT, is a CrossFit Athlete, CrossFit Coach, and gymnast.
This can be exhausting to practice, and just trying to get up in a handstand again and again might see you relying more on momentum than actually building the necessary muscles. That’s why the seated straddle raise, which you can practice right from the comfort of the good ol’ floor, is a great place to start.
“The seated straddle raise is really common in gymnastics circles,” says Elisabeth Akinwale, a certified personal trainer with a background in competitive gymnastics, who is leading Well+Good’s ReNew Year movement plan this month. “It’s a great exercise for working the whole front side of your core.” That includes your hip flexors, abs, and your quads.
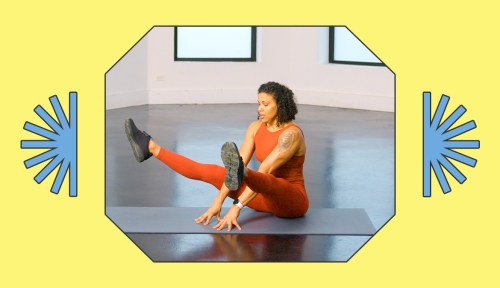
In a new video for Well+Good, Akinwale explains how to master this deceptively challenging move, which involves raising and lowering your legs while your bum remains on the ground.
Begin in a straddle position with your legs slightly wider than shoulder-width apart, and place your hands on the floor in between your thighs. Lock your knees and elbows, and engage your quads, arms, and back. Then, raise and lower both legs at the same time in a fluid, controlled motion.
But watch out: There are a few common mistakes people make in this move. Make sure to keep your legs straight, avoiding a bend in your knees. Raise both legs at the same time, not one at a time. And make sure you’re not hiking up your shoulders towards your ears—engaging your lats in your back will help.
Akinwale explains that the motion of the seated straddle is very similar to a handstand or toe raise because it involves the same motion.
“Part of the objective is to be closing that angle between your torso and your legs, so you’re getting that compression in your body, similar to a compressed handstand, or a toe raise,” Akinwale says. “This one might look easy but I guarantee you it’s harder than it looks.” Watch the full video to get her best tips on how to make it happen.
Sign Up for Our Daily Newsletter
Get all the latest in wellness, trends, food, fitness, beauty, and more delivered right to your inbox.
Want to stay strong, steady, and mobile for life? It’s time to stop thinking only about forward and backward movements and start training side to side.
advertisement
Lateral exercises boost your ability to move and stabilize in the frontal plane—a genuine game-changer for longevity. Developing this kind of strength helps prevent falls, improves balance, and keeps your joints healthy as you age (more on this later).
Whether you’re climbing stairs, getting in and out of a car, or just want to feel more confident in your body, adding lateral exercises to your routine can keep you moving with ease for years to come. Here’s your bulletproof guide.
How lateral exercises boost strength
Lateral strength is your ability to move side to side—think stepping sideways, lifting your arms, side-bending at the waist, or balancing on one leg, says certified strength coach Maggie Fazeli Fard.
These movements, known as frontal-plane motions, rely on small but crucial muscles like the gluteus medius (outer hip), adductors (inner thighs), and quadratus lumborum (a lower-back muscle that helps lift your hips).
Neglecting these muscles can lead to poor balance, lower-back pain, and even knee issues, says Fard.
Why does lateral strength matter for longevity?
Incorporating more lateral exercises into your routine isn’t just about moving better—it’s about aging better. Stronger lateral muscles improve balance, coordination, and lower-body stability, helping you stay active and independent as you age, says Fard.
Want to carry groceries, chase grandkids, or swing a golf club with ease? Here’s why lateral strength matters:
Balance: Falls are the leading cause of injury and death in seniors, with 1 in 4 older adults taking a spill every year, according to the Centers for Disease Control and Prevention. Strong lateral muscles help keep you steady.
Coordination: As we age, our brain slows down, affecting movement and reaction time. Lateral exercises help keep coordination sharp and movement smooth.
Lower-body mobility: Weak lateral muscles lead to stiff joints and poor mobility. Since most workouts focus on forward-backward movement (like running and lunging), skipping lateral work can leave you prone to injuries, says Fard.
advertisement
6 Best Lateral Exercises
Lateral strength is essential for balance, mobility, and injury prevention. But Fard says it’s best to think of these lateral exercises as accessory moves—not the core of your routine.
Sprinkle these moves into your workouts a few times a week (they’re great for warm-ups, pairing with bigger lifts, or conditioning workouts), and you’ll move stronger, smoother, and pain-free in no time.
1. Figure Eights
This low-impact move improves balance, coordination, and control—a perfect warm-up or daily brain-body booster, Fard says.
How to do it:
1.
Stand on your right foot, lifting your left knee to hip height.
2.
Extend your right arm forward.
3.
Gently move your left foot and right hand in small figure eight patterns (think: a sideways “8”) concurrently.
4.
Do 20 reps, then switch sides.
2. Side-Traveling Ape
This primal “animal flow” exercise engages “your lateral system from head to toe,” says Fard. Do it in warm-ups or pair it with heavy lower-body lifts.
How to do it:
1.
Stand with your feet hip-width apart, knees bent.
2.
Keeping your back flat, lean forward to place your hands on the floor shoulder-width apart, with your left hand directly in front of your right foot.
3.
Press your hands into the floor and hop your feet to the right, landing softly with feet hip-width apart.
4.
Bring your hands to the starting position and repeat for six steps, then switch directions.
5.
Perform three sets.
3. Side Plank March
advertisement
This move strengthens your hips, inner thighs, lower back, and shoulders while improving overall balance and full-body lateral stability, says Fard.
How to do it:
1.
Lie on your left side with your feet right foot directly in front of your left and your left elbow under your left shoulder, forearm along the floor.
2.
Press through your left forearm and lift your body so that you're balancing on your left forearm.
3.
Keeping your hips lifted, bend your right knee toward your chest, then return to start. Bend your left knee toward your chest; return to start.
4.
Continue “marching” for 8 total reps, then switch sides and repeat.
4. Banded Lateral Walks
This exercise strengthens the small stabilizing muscles around the hips (which are key for lateral strength), says Fard. Control is key here—no bouncing.
How to do it:
1.
Place a resistance band around your ankles.
2.
Stand with your feet hip-width apart and clasp your hands in front of your chest.
3.
Bend your knees slightly, and step to the left.
4.
Bring your right foot back to hip-width slowly, resisting the band's pull.
5.
Repeat on the right side (returning to start); continue alternating for 10 reps per side.
5. Lateral Lunge
Stronger hips, knees, back? This move can help you achieve all three, targeting the outer hips and inner thighs for improved hip stability and lower-body control, says Fard. (Make it harder by holding a pair of dumbbells.)
How to do it:
1.
Stand with your feet at hip-width distance, toes facing forward. Clasp your hands in front of your chest.
2.
Shift your weight to the right and step to your right with your right foot.
3.
With a flat back, bend your right knee and shift your hips back, keeping your left leg straight.
4.
Keep your toes pointed forward on both feet.
5.
Press into your right heel to return to standing.
6.
Complete 8–10 reps, then switch sides and repeat. Do 2–3 total sets.
6. Lateral Step-up
advertisement
This lateral step-up variation strengthens the outer hips, inner thighs, and lower back, making it a great prehab move for injury prevention, says Fard.
How to do it:
1.
You’ll need a bench or box to complete this exercise.
2.
Stand next to your bench and place your left foot on the bench, so that your left knee is bent round 90 degrees.
3.
Keeping your torso upright, press your weight into your left foot and push through your quads and glutes to straighten your left leg and stand on top of the bench.
4.
Reverse the move, lowering your right foot to the floor with control. Step your left foot down to the floor next to your right.
5.
Complete 8–10 reps, then switch sides and repeat. Do 2–3 total sets.
Sign Up for Our Daily Newsletter
Get all the latest in wellness, trends, food, fitness, beauty, and more delivered right to your inbox.
If you’re obsessed with all things Pilates, you already know about the best athleisure, accessories, and self-care moments to incorporate into your practice. However, you may be less familiar with a type of breathwork that can improve your practice — and help you feel more grounded.
Enter hypopressive breathing, a deep breathing exercise that involves emptying your lungs completely. It’s similar to the uddiyana bandha in yoga (or an “abdominal lock”).
“It involves breathing in a way that creates a vacuum-like effect in your thoracic, abdominal, and pelvic cavities by decreasing the pressure, causing a lift and toning of the pelvic floor,” says Anouska Shenn, a certified Pilates instructor and founder of The Office Yoga Company.
But before we get into how to do it, let us clear up one thing: Don’t try any breath-holding exercises during your practice, since Pilates focuses on breathing through movements.
That said, practicing hypopressive breathing before, after, or separate from your Pilates workouts can help support your practice in a number of ways.
What is hypopressive breathing?
Hypopressive breathing is a technique that involves completely emptying your lungs and holding that breath to create a vacuum. It serves as a core exercise that can benefit your pelvic floor health.
Think of it this way: Your abdomen is a closed pressure system. That means that when the pressure changes—like with a cough, deep breath, or force like a lift—your abdominal structures need to be able to manage that pressure properly. That’s where pelvic floor exercises, like hypopressive breathing, come in.
“When we’re not managing that pressure properly, gravity takes it and sends it down into the pelvic floor,” says Blair Mauri, MS, OTR/L, a pelvic floor therapist and owner of Blair Mauri Pelvic Health. “Repeated downward pressure not only weakens the pelvic floor, but can also cause it to become extremely tense.”
That tension may lead to symptoms such as incontinence, pelvic organ prolapse, painful sex, low back pain, or chronic constipation. “Hypopressive breathing is an excellent way to optimize pelvic floor function, as it provides a natural lift to these tissues without increasing the tension,” says Mauri.
Improving your pelvic floor function can relieve pelvic pain or low back pain, improve your oxygen and energy levels, promote digestion, and support your movement throughout your Pilates practice.
In fact, an eight-week program of hypopressive exercises improved pelvic floor muscle strength and urinary incontinence symptoms in women ages 18 to 60 with pelvic floor dysfunction and urinary incontinence symptoms, per a 2022 study1 in Neurourology and Urodynamics.
advertisement
Plus, hypopressive breathing can work your lungs in a way that benefits your Pilates practice. “Optimizing your rib mobility is also important for diaphragm function and getting the most out of your breaths,” adds Mauri.
How do you do it?
First, take a few deep breaths and see where you notice that pressure (in this case, your breath):
Is it focused in your chest or belly?
Are your ribs moving apart as you breathe in?
You should feel some mobility in all of these areas, not just one. “Rib mobility is especially important for proper hypopressive technique, so you may need to start here,” says Mauri. “Take some time to retrain your breathing so that everything expands on the inhale and comes back together on the exhale.”
Once you’ve honed in on that, you can move on to your hypopressive breathing exercises, following Mauri’s instructions:
1.
Gently exhale as if you are fogging a window. Don’t send any pressure or force down into your lower belly or pelvic floor.
2.
After you exhale, hold your nose and close your mouth and “pretend” to inhale without actually taking in any air. Think about widening those ribs, which will make your stomach begin to look concave.
3.
Hold this for 3-5 seconds and then inhale.
How does it benefit your Pilates practice?
This breathing technique shines as an add-on to your Pilates practice. You don’t want to hold your breath during Pilates moves (after all, Pilates is all about coordinating movement with breath), but hypopressive breathing exercises can serve as bumpers for an effective workout.
advertisement
“Hypopressive breathing is designed to stand alone, but you can use it as part of your warm-up or to close your Pilates practice,” Shenn says.
Pelvic floor strengthening is already often a key element of Pilates. In fact, a 12-week Pilates program focused on pelvic floor strengthening significantly improved stress urinary incontinence symptoms in women ages 45 to 70, with the results lasting even six months after the program, per a small 2020 study2 in the Journal of Alternative and Complementary Medicine.
“Hypopressive breathing complements a Pilates routine, as it also retrains and strengthens the deep core along with your pelvic floor,” says Mauri.
A strong and coordinated deep core and pelvic floor gives you more stability as you move your body throughout your Pilates practice—and throughout the rest of your day.
“Our pelvic floor muscles work together with our deep core muscles to stabilize the spine—supporting our posture and providing a solid foundation for all of our movements,” says Shenn.
Tips to get started
As you integrate hypopressive breathing into your Pilates routine, Shenn recommends keeping these tips in mind:
Start with 1-3 sets of 3 repetitions, resting between sets.
If you’re a beginner, practice your breathing lying down or seated, before progressing to more challenging positions like side-lying or quadruped (a four-point kneeling position).
Do your hypopressive breathwork on an empty stomach (it’s recommended to not eat at least two hours beforehand, since this type of breathing involves suctioning the abdomen inward and upward).
Avoid wearing clothes that are too tight—including collars, waistbands, and belts—as they can impede your breath.
Very little research has been done on the effect of breathwork on babies in the womb, so avoid hypopressive breathing if you’re pregnant.
advertisement
One more thing to note: Certain preexisting health conditions like high blood pressure can also be contraindications for breathwork, so always check with your doctor first and consider working with a trained provider to make sure your form is correct.
Molina-Torres G, Moreno-Muñoz M, Rebullido TR, Castellote-Caballero Y, Bergamin M, Gobbo S, Hita-Contreras F, Cruz-Diaz D. The effects of an 8-week hypopressive exercise training program on urinary incontinence and pelvic floor muscle activation: A randomized controlled trial. Neurourol Urodyn. 2023 Feb;42(2):500-509. doi: 10.1002/nau.25110. Epub 2022 Dec 8. PMID: 36482844; PMCID: PMC10107869.
Hein JT, Rieck TM, Dunfee HA, Johnson DP, Ferguson JA, Rhodes DJ. Effect of a 12-Week Pilates Pelvic Floor-Strengthening Program on Short-Term Measures of Stress Urinary Incontinence in Women: A Pilot Study. J Altern Complement Med. 2020 Feb;26(2):158-161. doi: 10.1089/acm.2019.0330. Epub 2020 Jan 9. PMID: 31916840; PMCID: PMC7044776.