4 Things Holding You Back From *Still* Not Being Able to Do Cobra Pose—and What to Do About It
A yoga teacher breaks down four reasons why you can't do cobra pose, plus how to finally nail the yoga pose.
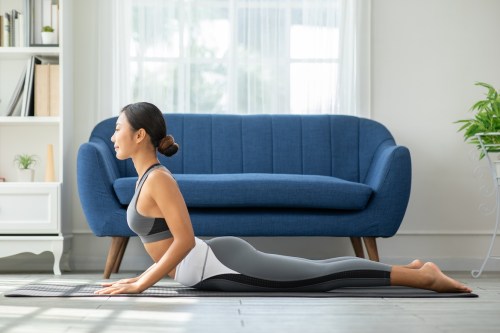
Many of us have a yoga pose we actively avoid or dread doing because it feels hard (not in a good way) or even painful to do. Cobra pose (Bhujangasana in Sanskrit) can easily be that pose.
Experts in This Article
a New York City-based registered yoga teacher
Maybe it’s because you’ve never been taught the finer details of how to do the posture and have experienced discomfort each time you try. Or maybe you’ve only done it as part of a fast-paced sequence and your brain and body can’t quite work together fast enough to truly figure it out.
No matter how many times you’ve done cobra pose, it can still feel elusive. But it’s worth doing the work to try and nail it since it’s a great way to stretch and strengthen the muscles in the front of your body and surrounding your spine.
Here are four common reasons why cobra pose might still feel inaccessible, plus a few ways to do some pose troubleshooting to finally enjoy the pose and embrace your inner snake.
1. You don’t have enough spinal mobility
If you feel like you can barely lift your upper body off your mat or get any kind of curve in your spine—let alone, a stretch —there could be a few reasons you feel this way.
The farther you move down your spine, the less mobility you typically have. Because cobra pose is technically a backbend and grows out of your lower and middle back to ultimately lift you up, you’re not exactly starting with a ton of flexibility here.
Cobra pose also relies on the strength of your back muscles to do some heavy lifting, which in our modern world, these muscles tend to be tight and weak due to poor posture and lots of sitting. So, if you enter this pose and feel like all these struggles are real, give these two moves a try to improve the strength and mobility around your spine.
Cat-cow pose (Bitilasana Marjaryasana)
Try gently stretching and moving your spine in cat-cow pose before going into cobra pose. Cat-cow helps open up your pelvis, torso, and spine, and many people enjoy it because it’s a softer way to increase your flexibility (thanks, gravity!).
Start by slowly rolling through your spine, gradually deepening the movement, while keeping an awareness on your mid and upper back. Notice if it helps you unlock a little bit more range of motion in cobra pose afterward.
- 1.Start in a tabletop position on your hands and knees, with your wrists aligned under your shoulders and knees under your hips.
- 2.Inhale as you arch your back, lifting your chest and tailbone towards the ceiling (cow pose).
- 3.Exhale as you round your spine, tucking your chin to your chest and drawing your belly button toward your spine (cat pose).
- 4.Flow smoothly between cat and cow poses, coordinating your movement with breath.
Low cobra pose (Ardha Bhujangasana) with hands hovering
Balance out the stretch with a strengthening exercise for your back muscles by practicing a low cobra pose with your hands hovering an inch or two off the floor. Hold this for three to five breaths as you hug your shoulder blades together and down your back.
Not only is this great for getting better at cobra pose, but it’s a wonderful way to increase muscle tone and counteract poor posture.
- 1.Begin by lying face down on your yoga mat, with your forehead resting on the ground. Keep your legs extended, press the tops of your feet down, and place your hands directly under your shoulders.
- 2.Scoop your elbows toward your body and spread your fingers wide. This creates a firm foundation with your hands on the mat.
- 3.Engage your abdominal muscles and lift your chest, while pressing your hips, pubic bone, and the tops of your feet into the mat.
- 4.Lift your palms an inch or two off the mat, then lift your head and chest off the ground as far as comfortable. Keep your gaze down and out and keep your neck neutral.
- 5.Hold for three to five breaths, then gently return to the starting position.
2. You aren’t using your hands and arms enough
As a seasoned yoga teacher with over seven years of teaching experience, one of the most common misalignments I see in students practicing cobra pose are splayed out elbows and shoulders creeping up towards the ears.
“It’s extremely common for yoga practitioners of all experience levels to complain about sharp pain in the palms and wrist joints” in cobra pose, yoga teacher Divya Balakrishnan, E-RYT 200, also points out.
These are like flashing red lights that point to a couple of misalignments and key muscle groups that aren’t working for you like they could be. Try these simple corrections and notice any shifts:
- First, briefly check your alignment by making sure your hands are beneath your shoulders or even slightly lower (toward your chest), and that you’re lengthening your spine.
- Second, actively hug your elbows in—a single move that creates a chain reaction by properly aligning your arms, shoulders, and shoulder blades, and keeps your shoulder blades back so you your chest doesn’t collapse in.
- The third and final step is to strongly press your hands down to lift your torso while simultaneously pulling your shoulder blades down your back. “I always encourage my students to try the hand bind,” Balakrishnan says. “Broaden the palm, draw energy toward the center, and press down firmly. This “suction” mechanism also engages the larger muscles in your forearms, upper arms, all the way up to your shoulders to carry the load. This way our relatively flimsy wrist joint doesn’t take the lion’s share of the weight.”
Cobra pose with proper hand and arm alignment
- 1.Begin by lying face down on your yoga mat, with your forehead resting on the ground. Keep your legs extended, press the tops of your feet down, and place your hands directly under your shoulders.
- 2.Scoop your elbows toward your body and spread your fingers wide. This creates a firm foundation with your hands on the mat.
- 3.Gently press into your palms, then lift your head and chest off the ground as far as comfortable. Keep your gaze down and out and keep your neck neutral.
- 4.Hold for three to five breaths, then gently return to the starting position.
3. Your lower back isn’t getting enough support
If the mere thought of getting into cobra pose conjures a painful feeling in your lower back, you’re certainly not alone. It’s important to mention that the spectrum of pain sensations is wide and varied, but also unique to you. And if you’re experiencing extreme or shooting pain, talk to your doctor before practicing yoga.
With that being said, yoga can be safe to do with lower back pain because gentle movement that doesn’t make it worse can potentially make it better—or at least help you find alternative ways to practice a pose you might otherwise avoid.
As we mentioned earlier, your lower back has far less natural mobility than other parts of your body, and it can occasionally be vulnerable to getting squished, crunched, and jammed up in cobra pose. This can be related to spinal alignment and even the position of your legs (didn’t see that last one coming, did you?), but in some cases, there’s a pre-existing injury that might make the pose tricky to do without you saying “ow!”
Here are a few tips to help give your back enough support in cobra pose so you don’t experience dreaded back pain during the move:
- “A mistake I see people make in cobra pose is they arch their back without drawing their chest forward first and then lifting up,” Balakrishnan says. “Further, if they’re not engaging their abdominals by drawing their core inward, they’re putting additional strain on their spine. Not taking these simple extra steps can easily cause lower back pain.”
- Keep your legs hip-width distance apart in cobra pose to avoid jamming up your lower back. While you might be tempted to hug your legs and feet together to look like an actual cobra, remember, unlike this coily snake, you do not have a tail. Don’t worry about specifics, and simply allow your legs to splay out to a comfortable distance that feels natural.
- Fold up a yoga blanket in a long, slim rectangle or use a small yoga bolster and place it beneath your lower belly and front hips so the lower half of your pelvis is falling off the prop. This gently lifts your upper body higher for an easier entrance into the pose that takes the pressure off your lower back (literally).
Cobra pose with folded blanket
- 1.Begin by lying face down on your yoga mat, with your forehead resting on the ground. Keep your legs extended, press the tops of your feet down, and place your hands directly under your shoulders.
- 2.Fold a blanket in a long, slim rectangle or use a small yoga bolster and place it beneath your lower belly and front hips so the lower half of your pelvis is falling off the prop.
- 3.Scoop your elbows toward your body and spread your fingers wide. This creates a firm foundation with your hands on the mat.
- 4.Gently press into your palms, then lift your head and chest off the ground as far as comfortable. Keep your gaze down and out and keep your neck neutral.
- 5.Hold for three to five breaths, then gently return to the starting position.
4. You’re tucking your tailbone
For a long time, many yoga instructors used to think tucking your tailbone would help lengthen the lower back and avoid pain. Though well intentioned, this guidance is incorrect, and rather than lengthening the spine, limits the backbend instead.
In a healthy backbend, your pelvis and lower back should tip forward as the rest of your spine follows. This means your tailbone actually does the opposite of tucking by moving away from the mat—since the lower and upper back curves mirror one another.
Try not to tuck your tailbone so that your pelvis (or more specifically, pubic bone) scoops under, but to leave it as it is. This one tiny adjustment can help free up the rest of your spine to do a healthful backbend so it feels good.
Sign Up for Our Daily Newsletter
Get all the latest in wellness, trends, food, fitness, beauty, and more delivered right to your inbox.
Got it, you've been added to our email list.
