As far as bodyweight exercises go, push-ups give you a lot of bang for your buck. The staple upper-body movement not only works several muscle groups all at once, but can also help you improve your posture and joint stability.
a physical therapist and director of movement at STAT Wellness in Atlanta, Georgia
But push-ups require a lot of upper-body strength and core stability, making them hard to do—and even harder to do correctly.
Whether you’re looking to level up your push-up form or find push-up alternatives that work the exact same muscles, we’ve got tips for perfecting your technique and go-to modifications that offer the same upper-body benefits.
How to do a push-up with perfect form every time
Traditional push-ups “target almost every muscle in your upper body, no equipment required,” says Julia Caban, CPT, a certified personal trainer and coach at Performance360 in Oceanside, California.
But doing a push-up correctly is harder than it looks. Katelyn Raymond, PT, DPT, a physical therapist and director of movement at STAT Wellness in Atlanta, Georgia, suggests thinking about a push-up as a moving plank.
And just like when holding a plank, while doing a push-up, you need to keep your core engaged to keep your hips level and avoid strain in your lower back.
“Also avoid rounding your shoulders, which stresses the shoulder joint and can lead to injury,” Raymond says.
Here’s how to execute the perfect push-up:
Photo: Katelyn Raymond, PT, DPT
1.
Start in a high plank position with your palms directly beneath your shoulders and your feet hip-width apart.
2.
Keeping your weight forward on your toes, draw your shoulder blades away from one another to engage your upper back and pull your belly button toward your spine to engage your core.
3.
Keeping your elbows at a 45-degree angle, slowly lower your torso until your chest touches the floor or mat. (If you can’t lower all the way toward the floor, go as far down as is comfortable.)
4.
Press into your hands and engage your core to straighten your arms and return to the starting position.
But you’ll also work your core—particularly your obliques (the muscles on the sides of your torso) and transverse abdominis (the deep abdominal muscles that extend from your ribs to your pelvis)—to stabilize your body as you lower and lift in the push-up position.
Push-ups also fire up lower-body muscles like your hamstrings and glutes, which help you maintain that strong plank position as you bend and straighten your arms.
The benefits of push-ups that’ll convince you to add them to your workouts
Push-ups are important because they combine trunk stability with upper-body strength and mobility, according to Raymond. In everyday life, this functional movement is similar to pushing a chair or sofa across a room or opening a door.
“Very few other movements hit such a variety of muscles without any equipment required,” Caban says.
advertisement
This move also improves your joint stability, decreasing your risk of injury, whether that’s doing your sun salutations in yoga class or pulling weeds in your garden.
Spend much of your day sitting? Push-ups can help.
“Push-ups always help to open the chest area when you perform them in full range, which is great for those who have desk jobs and rounded shoulders,” Raymond says.
Modifications are a great way to build up to the traditional exercise, target the same muscles with less strain on your body, or accommodate injuries or conditions that make it difficult to execute the full push-up motion.
Okay, seriously, why are push-ups so hard?
While push-ups don’t require special equipment and are a staple of fitness classes from HIIT to Pilates, they are hard. Like, really hard.
“Push-ups require substantial trunk and upper-body strength,” Raymond says. “And a lot of muscles need to work together to perform a traditional push-up correctly.”
Caban agrees.
“When you do a push-up, you’re pushing up your entire body weight, which is not easy,” she says.
Who are push-up alternatives best for?
Modifications are a great way to build up to the traditional exercise, target the same muscles with less strain on your body, or accommodate injuries or conditions that make it difficult to execute the full push-up motion.
advertisement
Push-up alternatives are ideal for pregnant people, especially those in second and third trimesters who “find a prone position to taxing on the core and pelvic floor,” Caban says.
Caban also recommends push-up alternatives for people who experience wrist pain or have issues with shoulder blade stability.
The best push-up alternatives to add to your routine
All of these push-up alternatives work the same muscles—think arms, chest, upper and lower back, and core—as the traditional exercise.
“As with everything, consistency is key. So start with a push-up variation that you can do and work from there,” Raymond says.
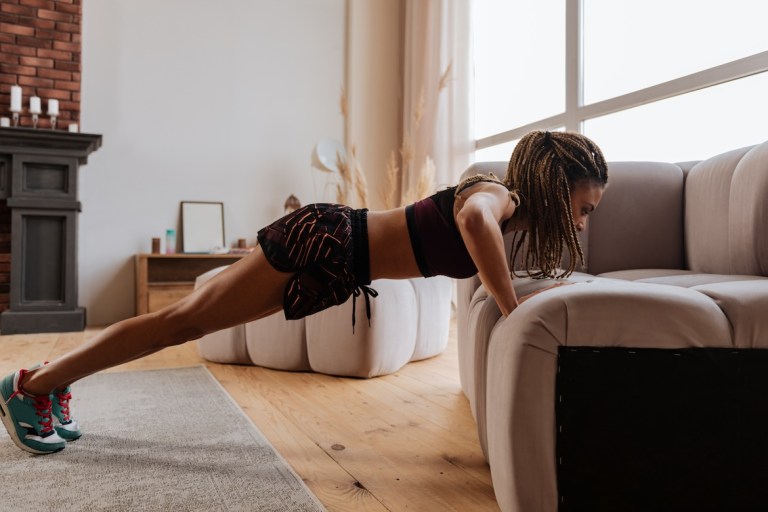
1. Elevated push-up
Raymond recommends this alternative because it helps you practice the long, stable plank position needed for a traditional push-up, but it’s less strenuous on your body.
“Start as high as you need to to achieve proper form—this exercise can be done using a wall, counter, table, bench, or step,” she says.
Photo: Katelyn Raymond, PT, DPT
1.
Place your hands on a stable surface like a weight bench and walk out to a plank position with your shoulders over wrists and your feet hip-width apart.
2.
Keeping your core engaged and your shoulders square, inhale as you bend your arms to a 45-degree angle and lower your chest to the bench or wall.
3.
Exhale as you push into your hands and straighten your arms to return to the starting position.
4.
Repeat.
advertisement
TIP
To up the intensity, place your hands on a lower surface like a stair or aerobic step. To ease the load on your body, start on a higher surface like a wall and work on perfecting your form.
2. Band-assisted push-up
The band supports your body so you can move through a full push-up without actually having to press your entire weight up and down.
“This is one of my favorite ways to help people feel successful in a push-up,” Raymond says.
Photo: Katelyn Raymond, PT, DPT
1.
Attach a long loop band to an anchor point, like a post, then wrap it around your shoulders like a backpack.
2.
Walk out to a plank position with your shoulders under your wrists and your feet hip-width apart.
3.
Bend your elbows to a 45-degree angle as you lower your chest to the ground, keeping the body in a long line.
4.
Press into your hands to push back up to the starting position.
5.
Repeat.
advertisement
3. Eccentric push-up
Raymond likes this variation because it strengthens all the same muscles as a push-up.
Photo: Katelyn Raymond, PT, DPT
1.
Start in a high plank position with your shoulders stacked above your wrists and your feet planted hip-distance apart.
2.
Engage your core and slowly lower your body to the mat or ground.
3.
Keep your knees down as you press into your hands and lift your chest back to starting position.
4.
Lift your knees back up into high plank position.
5.
Repeat.
TIP
By starting in the plank position before lowering to your knees, this alternative helps you practice keeping your core engaged and shoulders in a stable position—two of the challenges of a traditional push-up.
4. Dumbbell bench press
A dumbbell bench press is just a push-up flipped to a supine position (on your back), so it works the same upper-body muscles, according to Caban.
advertisement
Photo: Julia Caban, CPT
1.
Lie on your back on an exercise bench, holding two dumbbells (palms facing down) on your legs for support. Make sure your feet are firmly planted on the floor. If you don’t have an exercise bench, lie on the floor with your knees bent and feet flat on the floor.
2.
Bring the dumbbells in line with your shoulders with your wrists facing away from your body.
3.
Press the dumbbells toward the ceiling as you straighten your arms out in front of you.
4.
Slowly bend your arms to lower the dumbbells back to your chest.
5.
Repeat.
TIP
Flip your wrists to face each other to do a narrow-grip chest press, which targets your triceps, upper chest, and anterior deltoids (front of the shoulder).
5. Knee push-up
The kneeling position takes the pressure off your wrists and some load from your upper body while still strengthening your upper body and core, Caban says.
Photo: Julia Caban, CPT
1.
Start in a plank position with your shoulders stacked above your wrists and your feet planted hip-distance apart.
2.
Lower your knees to the ground, keeping your core tight and hips and shoulders in a long line.
3.
Press into your hands and bend your elbows wide to the side to lower your chest to the ground without hiking up or sinking down your hips.
4.
Push into your hands and straighten your arms to return to the starting position.
5.
Repeat.
advertisement
6. Push-up with wrist support
Many people struggle with traditional push-ups because it puts pressure on the wrists. Using dumbbells or small parallel bars for wrist support is a great alternative for people with wrist injuries or shoulder instability, Caban says.
Photo: Julia Caban, CPT
1.
Grip two dumbbells or small parallel bars with your hands, wrists facing in, and knuckles to elbows in a straight line.
2.
Step your feet out hip distance to a plank position.
3.
Bend your elbows and lower your chest toward the ground, keeping your core engaged.
4.
Press into the dumbbells or bars and straighten your arms to finish.
5.
Repeat.
Sign Up for Our Daily Newsletter
Get all the latest in wellness, trends, food, fitness, beauty, and more delivered right to your inbox.
When it comes to building strong, sculpted glutes, most of us focus on big moves like squats and deadlifts. But if you want to truly level up your lower-body strength (and get that lifted, rounded shape), it’s time to give your upper glutes some serious attention.
exercise physiologist and part-time teaching faculty at the University of Georgia
advertisement
“This area is often ignored,” says Holly Roser, CPT, a certified personal trainer and owner of Holly Roser Fitness. And that really is a shame. The upper glutes—specifically, the gluteus medius and gluteus minimus—are the secret weapons behind hip stability, posture, and lower-back support.
Strengthening them doesn’t just help with aesthetics; it also boosts athletic performance, prevents injury, and improves overall mobility. Whether you’re an avid lifter, a runner, or just looking to move pain-free, targeting this area can make all the difference. (NOt to mention that ignoring it could lead to a glute imbalance.)
So how do you engage these often-overlooked muscles? It’s all about strategic activation and mind-muscle connection. We asked top trainers for the most effective upper-glute exercises that actually work, from banded hip abductions to single-leg deadlifts. Ready to fire up those glutes and feel the difference?
Keep reading for a science-backed upper butt workout that will leave you stronger, more balanced, and yes—perkier.
First things first: A refresher on upper glute anatomy
When exploring any glute-focused exercises and charting out glute goals, it helps to understand our glute anatomy.
Your glutes are comprised of the gluteus maximus, the gluteus medius, the gluteus minimus, and the piriformis, according to ACE certified health coach and personal trainer Araceli De Leon, MS.
Where your gluteus maximus is the largest and most superficial of the glute muscles (meaning that it’s the outermost layer), your gluteus minimus is the deepest glute muscle, located underneath the gluteus maximus and gluteus medius, De Leon says.
Meanwhile, the gluteus medius is what we know to be the upper glutes.
“The gluteus medius is responsible for abduction or lateral raise and rotation of the hip joint,” De Leon says. “However, the gluteus maximus is so large relative to the others that it is also part of the upper glutes.”
From an appearance perspective, certified personal trainer Amy Schemper, CPT adds that the gluteus medius is “responsible for the ‘glute shelf’ look” that many desire.
What are the benefits of upper glute exercises?
When you do upper glute exercises, whether they’re standing or seated, Roser says you’ll experience numerous benefits—not just in the way you feel, but also when it comes to your athletic abilities.
advertisement
“You’ll reduce lower back pain, knee pain, and the risk of ankle sprains, as this important muscle is a strong stabilizer,” she says. “You’ll also notice you’ll have a faster running speed and be able to increase the resistance used in your workouts.”
The reason? Stronger upper glutes lead to more overall bodily stability.
“Besides keeping our hips level and stable, our upper glutes have a very important job in our overall biomechanics, stability, and balance,” says Nashville-based certified personal trainer Bianca Vesco, CPT. “When we walk and or run, our upper glutes aid in stabilizing our pelvis. They also play a critical role in maintaining an efficient and safe lower body.”
There’s also another benefit: You’ll notice a more lifted and pronounced booty, Roser says. So if you’ve ever wondered why your bum is flat at the top, it’s because you need to incorporate upper glute exercises into your routine.
The ideal reps and sets to build your upper glutes
Before diving in, take a moment to consider your upper glute goals. Do you want to strengthen, stabilize, or maintain or build a shelf? You’ll want to tailor your routine to fit your fitness dreams, according to Vesco.
“Are you trying to build muscle mass and strength by lifting heavy weights?” she asks. “Are you correcting an imbalance or rehabbing an injury with a resistance band?” In either scenario, you can expect upper glute benefits. The way you go about them just differs.
Here’s what we mean: The number of reps and sets you perform is dependent on your glute goals, as is the amount of time you take to rest between each.
“If you are aiming for muscle hypertrophy and added mass, aim for heavier weights for lower rep ranges—four to eight repetitions—for three to five sets during your larger compound movements such as squats, lunges, deadlifts, and hip thrusts,” Schemper says. “If muscular endurance is your goal, find a weight you can maintain for 12 to 20 repetitions for three to four sets for larger movements and an elastic mini band around knees or ankles for 15 to 20 repetitions on smaller movements.”
Meanwhile, if you’re exploring upper glute exercises to correct a muscle imbalance or rehab an injury, Schemper says to start slowly with low weights, resistance, and reps, and gradually increase as you feel stronger.
No matter which approach you take, you want to feel challenged.
advertisement
“At the end of the day, you want to be progressively overloading the glute muscles to see change,” Schemper says. “If something feels too easy, it’s probably time to increase your weights, resistance, reps, or sets—or all of the above. If you’re fatiguing quickly or not able to finish sets or reps, it’s time to take it down a bit.”
“Besides keeping our hips level and stable, our upper glutes have a very important job in our overall biomechanics, stability, and balance. When we walk and or run, our upper glutes aid in stabilizing our pelvis. They also play a critical role in maintaining an efficient and safe lower body.” —Bianca Vesco, CPT
The best upper glute exercises to add to your routine
So, how do you work the top of your glutes? According to Schemper, the key to building upper glutes is to focus on hip abduction (moving away from the center of the body).
“However, remember no muscle works in isolation, so while smaller isolated movements help target the upper glutes, it’s important to work the lower body with larger compound moves like squats, deadlifts, and lunges,” she reminds us.
Although you can work your glutes by walking, running, and other everyday functional movements, there are some exercises that can really boost booty gains. Here are nine upper glute exercises that are sure to make your buns burn.
1. Clam shell
1.
Lie on your left side with your knees bent at 90 degrees, stacked on top of each other.
2.
Lean your head on your left arm to support your neck and place your right hand in front of you for support.
3.
Keep your feet together and lift your top knee as high as possible without rotating your pelvis.
4.
Hold for a moment, then lower your knee back to the starting position.
5.
4. Do 2 sets of 25 reps, then switch sides.
2. Curtsy lunge
1.
Stand with your feet hip-width apart and your arms clasped in front of your chest.
2.
Step back with your right leg, crossing it behind your left leg in a curtsy position.
3.
Bend both knees until your front leg is parallel to the floor (or as close to parallel as you can comfortably go).
4.
Keep your hips and shoulders straight ahead throughout the motion with your torso upright.
5.
Push through your left leg to return to standing.
6.
Repeat for 3 sets of 15 reps on each side.
3. Sumo squat
1.
Stand with your feet wider than your shoulders with your shoulders, back, and core engaged. Turn your toes out 45 degrees and clasp your hands in front of your chest.
2.
Bend your knees as you push your hips back to lower toward the floor. Let your knees track diagonally out toward the direction of your toes as you lower.
3.
Lower down until your thighs are parallel with the floor (or as far as you can comfortably go).
4.
Pause for a moment, then return back to standing.
5.
Do 3 sets of 12 to 15 reps.
advertisement
4. Lateral lunge
Stand with your feet at hip-width distance, toes facing forward. Clasp your hands in front of your chest.
Shift your weight to the right and step to your right with your right foot.
With a flat back, bend your right knee and shift your hips back, keeping your left leg straight.
Keep your toes pointed forward on both feet.
Press into your right heel to return to standing.
Do 12 to 15 reps, then repeat on the right side—or go back and forth between sides.
5. Banded lateral walk
1.
Place a mini band or looped resistance band around your thighs at a tension that’s comfortably challenging.
2.
Stand with your feet hip-width apart and your hands clasped in front of your chest.
3.
Bend your knees as you push your hips back to lower toward the floor into a squat position as if you were sitting in a chair.
4.
Step your right foot to the side in line with your other foot. Step together and repeat.
5.
Do 3 sets of 15 reps in each direction.
6. Dumbbell front squat
1.
Stand with your feet hip-width apart (or a little wider) with your shoulders, back, and core engaged. Hold a dumbbell in each hand (palms facing in toward your body) with your arms at your sides.
2.
Bend your elbows to lift the dumbbells up high on your shoulders in a racked position with your elbows slightly in front of your shoulders.
3.
Bend your knees as you push your hips back to lower toward the floor into a squat position as if you were sitting in a chair.
4.
Lower down until your thighs are parallel with the floor (or as far as you can comfortably go).
5.
Pause for a moment, then return back to standing.
6.
Do 3 sets of 12 to 15 reps.
7. Sumo deadlift
1.
Stand with your feet wider than your shoulders with your shoulders, back, and core engaged. Turn your toes out 45 degrees.
2.
Place a dumbbell on the floor vertically between your legs.
3.
With a flat back and braced core, hinge at your hips and bend your knees to grasp the head of the dumbbell.
4.
Drive your feet into the ground and straighten your legs to slowly come up to standing, activating your glutes in the process. Keep your arms straight the entire time.
5.
Slowly lower yourself back down.
6.
Do 3 sets of 15 reps.
8. Single-leg Romanian deadlift
1.
Stand with your feet hip-width apart. Tuck your right elbow into your right side as if you were running. Extend your left arm by your side.
2.
Drive your left knee up to hip height so your left thigh is parallel to the floor. You should be balancing on your right leg.
3.
Engage your core and simultaneously lean forward, extending your left leg behind you. Press your right foot into the floor while doing so, and keep your right leg slightly bent.
4.
At the same time, lower your right arm down by your side and tuck your left elbow into your left side as if you were running.
5.
Continue lowering until your torso is parallel to the floor or you feel a pull in your right hamstrings (whichever comes first).
6.
Press into your right foot, squeeze your glutes and reverse the movement to return back to the standing start position.
7.
Do 10-12 reps on one leg before switching sides.
9. Side hip abduction
1.
Lie on your left side with your legs extended and your feet stacked on top of each other.
2.
Lean your head on your left arm to support your neck and place your right hand in front of you for support.
3.
Keeping your legs straight and squeezing your glutes, lift your top leg to around shoulder height without rotating your hips.
4.
Pause, then slowly lower your top leg back down to starting position.
5.
Do 2 sets of 25 reps on each leg.
advertisement
TIP
If you’re having a hard time keeping your legs from coming forward, you can lean against a wall and have your top leg slide to correct any slanting of your body that might occur.
10. Banded standing hip abduction
1.
Stand with a resistance band around your ankles, feet hip-width apart, knees straight but not locked.
2.
Keeping your legs straight and squeezing your glutes, shift weight to one leg and lift the other leg out to the side without rotating your hips.
3.
Pause, then slowly lower back down to starting position.
4.
Do 12-15 reps per leg.
11. Fire hydrants
1.
Start on all fours with your hands and knees on the floor. Align your elbows and shoulders over your wrists and your hips over your knees
2.
Lift one knee out to the side, keeping it bent at 90 degrees.
3.
Avoid rotating your hips—keep the movement controlled.
4.
Lower back down and repeat.
5.
Do 2 sets of 20 reps on each leg.
12. Bulgarian split squat
1.
Stand a few feet in front of a bench, box or chair, facing away from it. Clasp your hands in front of your chest. (Increase the challenge by placing a barbell or dumbbell on your hips.)
2.
Reach your left foot back and place the top of your left foot flat on the surface. You may need to hop your right foot forward so you can do a proper lunge.
3.
Lean your torso forward slightly and bend your front knee to sink your hips toward the floor as low as you can comfortably go.
4.
Your front-leg shin should be vertical or close to it, while your back knee should point down toward the floor. If either leg is out of place, move your front foot forward or backward until you’ve found the ideal positioning.
5.
Push through your front foot to return to standing.
6.
Repeat for 10-12 reps, then switch sides and repeat.
13. Step-up
1.
You’ll need a bench or box to complete this exercise.
2.
Stand in front of your bench and place your left foot on the bench, so that your left knee is bent round 90 degrees.
3.
Keeping your torso upright, press your weight into your left foot and push through your quads and glutes to straighten your left leg and stand on top of the bench.
4.
Reverse the move, lowering your right foot to the floor with control.
5.
Do 10-15 reps, then switch sides and repeat.
14. Single-leg glutes bridge
1.
Lie on your back with your arms by your sides, knees bent and feet flat on the floor hip-width apart. Your feet should be close enough to your hips that if you reach one hand at a time toward each heel, you could just touch it with your fingers.
2.
Extend your right leg straight on the floor.
3.
Tuck your tailbone slightly. Squeeze your glutes and core, then press your left heel into the floor to drive your hips up toward the ceiling until you form a diagonal line from knees to hips to chest.
4.
Squeeze your glutes at the top of the exercise and pause for a moment. Then slowly return your hips to the floor.
5.
Do 10-12 then switch legs and repeat.
advertisement
15. Hip thrust
1.
Sit on the floor with your mid back against the edge of a bench, box, couch, or wide chair. Clasp your hands in front of your chest. (Increase the challenge by placing a barbell or dumbbell on your hips.)
2.
Place your feet on the floor about hip-width apart. Your feet can be slightly turned out, depending on what feels most comfortable for you.
3.
Squeeze your glutes and push through your heels to raise your hips up toward the ceiling. Keep your back flat and head pointed toward the wall in front of you.
4.
Lock your hips out at the top of the movement by fully extending your hips and squeezing your glutes. Your shins should be vertical, knees neutral or slightly externally rotated and legs forming 90-degree angles.
5.
Pause, then slowly lower your hips to the floor.
6.
Do 2 sets of 12-15 reps.
16. Single-leg hip thrust
1.
Sit on the floor with your mid back against the edge of a bench, box, couch, or wide chair. Clasp your hands in front of your chest.
2.
Lift your right leg off the ground, and push through the heel of your left foot while you push your hips up to the ceiling by squeezing your glutes.
3.
Pause, then slowly your hips back towards the floor.
4.
Do 2 sets of 25 reps per side.
What not to do: Habits that could weaken your glutes
If you regularly do many of these exercises but don’t seem to be noticing any change in the look or feel of your upper glutes, you may be engaging in other behaviors that’s voiding out your hard work.
“You may not be lifting heavy enough, eating enough for your energy expenditure, or you may need more variety in your glute workouts,” Schemper says. “The key to engaging your glute muscles for growth and strength is to make sure you’re actually utilizing the right muscles. In traditional movements like squats or lunges, our quadriceps muscles are our primary movers and tend to do most of the work. To turn on the glute muscles, be sure to get low into the movement and push through the heels as you contract.”
It’s important to also be mindful of your pelvis during all upper glute exercises, Schemper says.
“Many of us experience an anterior pelvic tilt (where our pelvis is tilted forward) which can affect our ability to activate our glute muscles during exercise,” she reveals. “Banded glute bridges and deep core exercises can help correct anterior pelvic tilt, as evidenced by this study1. With a stronger core and more neutral pelvic alignment, our glutes can better engage in lower-body movements.”
Frequently Asked Questions
How do I give my upper butt a natural curve?
Be consistent—and patient. “If you’re looking to build a stronger, more muscular butt, it’s going to take some time,” Vesco says. “You have to lift heavy with a plan, you have to eat more to fuel those lifts, you have to stay consistent in the gym, and you have to show yourself grace. Rome wasn’t built overnight and neither is a bigger booty!”
advertisement
How do I know if my upper glute workout is working?
Remember: Upper glute gains take time. You may feel like your hard work isn’t accounting for much, but Vesco reminds us that there are studies that suggest optimal glute growth can take between 18 months and two years to really witness.
“The work is never over and consistency always gives you the possibility to expedite that process,” she says. “However, training for life is a lifelong journey and taking care of your glutes and overall leg strength is a surefire way to make sure you’re still strong and able-bodied at 80 years old. Strong glutes, strong legs, strong life.”
Can you work out your glutes two days in a row?
TL;DR: It depends on your skill level and overall fitness.
“There are many aspects to consider when discussing exercise recovery, including training or exercise volume and frequency, adequate sleep, proper nutrition, training periodization, rest days, and more,” Rachelle Reed, PhD, an exercise physiologist, explains. “Recovery is an important part of a training program and aims to restore the body to homeostasis [a balanced state] and occurs during the time outside of an exercise training session.”
With that in mind, if you’re new to resistance training—and especially if you’re performing large muscle, multi-joint exercises like squats, lunges, deadlifts, and hip thrusts—a 24- to 48-hour rest period is ideal.
“Basically, monitor your perceived soreness levels,” Dr. Reed says. “DOMS—delayed onset muscle soreness—can start and last anywhere from 24 to 72 hours or more depending on a variety of factors. So, your best bet is to start slow and monitor how you feel. After a few sessions, you will understand how your body is reacting.”
Once you become more experienced with upper glute workouts, it’s totally fine to train back-to-back, according to Dr. Reed—though, she still recommends switching it up for the most noticeable gains.
“The most effective programs will mix different movement patterns, loading, and other techniques to progress efficiently and safely,” she says. “The main point to note while going for booty gain will be you are aiming for hypertrophy [increasing muscle size/volume] and adequate, but appropriate for your fitness level, loading will be highly important.”
How many times a week should I work out to grow a butt?
There’s no one set answer.
advertisement
“How often you should perform these exercises depends on how heavy you’re lifting for them,” Vesco says. “Heavy lifts for muscle growth and strength should only be done one to two times per week.”
Can you change the shape of your glutes through exercise?
Yes, but it will take time.
“Anyone can change the shape of their butt, but it depends on how drastic you want that change to be,” Vesco says. “We all have our own goals and standards but if your goal is to grow a bigger booty, you need to focus on the entire backside, not just the upper glutes. Building strength in the gluteus maximus, medius, and minimus will get you there much faster.”
Additionally, it’s important not to overwork your glutes in hopes of faster results.
“You definitely need to stimulate the muscles to help them grow, but training them too much can be counterproductive if you don’t give them time to rest, repair, and rebuild,” Vesco says.
What are the most useless exercises for building your glutes?
“Bicep curls!” Vesco jokes. “‘Building’ can mean a lot of things for a lot of people but if you want to actually increase the size of your backside, you have to lift heavy weights consistently.”
Why are my upper glutes not growing?
As hard as you may be working to grow your booty, you may simply be focusing on the wrong areas and glute exercises.
“If you aren’t seeing glute growth, you may be training mostly in the sagittal plane—think squats and lunges—train in the horizontal plane with banded side steps and side lunges, as well as the transverse plane with curtsy lunges, for better glute gains,” Schemper says.
It’s also possible to plateau while working out. In fact, it’s common. Your body can adapt to movements, weights, and workouts, according to De Leon. So if you’re doing all of these exercises but aren’t reaping any new rewards, she says it’s time to mix it up with more weight, reps, or new exercises altogether.
“Another example, if you’re using bands, try using cable machines; or if you’re using machines, try free weights such as barbells, dumbbells or kettlebells,” she says.
Sign Up for Our Daily Newsletter
Get all the latest in wellness, trends, food, fitness, beauty, and more delivered right to your inbox.