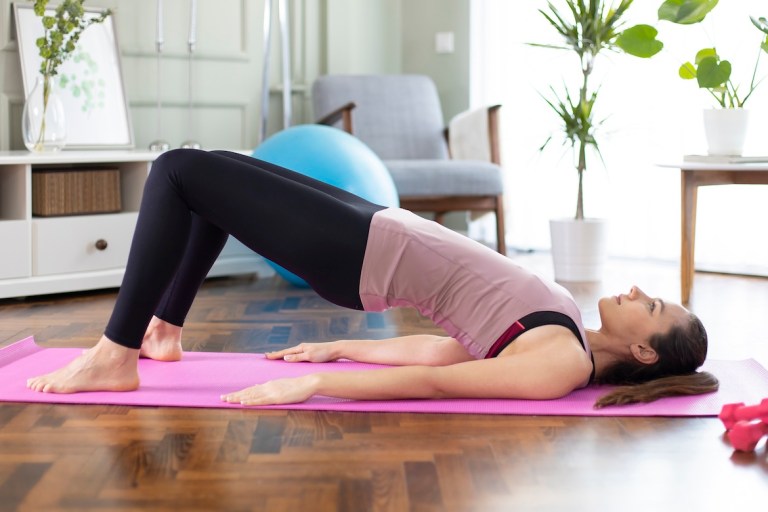
To the casual observer, glute bridges and hip thrusts appear practically identical. Both involve lying on your back and lifting your hips while keeping both feet flat on the floor. But if you look closer, there are key differences—and those differences mean each butt exercise offers unique perks.
Experts in This Article
head personal trainer at Blink Fitness in New York City
certified personal trainer with Life Time in Eden Prairie, Minnesota
vice president of programming and education at BFT
“Both glute bridges and hip thrusts target the glutes, but the positioning and equipment are different,” says Ellen Thompson, CPT, a personal trainer with Blink Fitness. Whereas glute bridges are performed on the floor, generally without equipment, hip thrusts use a bench and, often, weights.
So, which approach is better for your glutes? We tapped a few fitness experts to find out everything you need to know about the glute bridge versus the hip thrust.
Glute Bridges
The glute bridge is a simple and effective way to isolate your glutes. Other lower body exercises, such as squats and deadlifts, also work your glutes, but require more input from your legs and core to maintain posture and coordinate the movement.
“If I’m lying on the floor, I don’t have to do any of that,” says Steve Stonehouse, CPT, vice president of programming and education at BFT. You can simply focus on targeting the glutes.
How to do them with correct form every time
Lindsay Ogden, CPT, a personal trainer with Life Time in Eden Prairie, Minnesota, breaks down how to perform a glute bridge step by step:

- 1.Lie on your back with your knees bent and your feet flat on the floor, about hip-width apart. Your feet should be close enough to your hips that if you reach one hand at a time toward each heel, you could just touch it with your fingers.
- 2.Rest your upper arms and elbows on the floor and make a fist with your hands.
- 3.Tuck your tailbone slightly. Squeeze your glutes and core, then press your heels into the ground to drive your hips up toward the ceiling until you form a diagonal line from knees to hips to chest.
- 4.Squeeze your glutes at the top of the exercise and pause for a moment.
- 5.Then slowly lower your hips back down to the floor.
- 6.Repeat.
Begin with three to four sets of 10 to 20 reps of bodyweight glute bridges and add resistance with a band or dumbbell on your hips as you progress.
TIP
You can also perform glute bridges with your arms down by your sides if that’s more comfortable for you.
Muscles worked
“As the name suggests, the glute bridge primarily targets the glutes, specifically the gluteus maximus,” Ogden says. However, there are other muscles involved in the exercise.
These are the muscles that are worked in a glute bridge, according to Ogden:
- Gluteus maximus: The gluteus maximus (also called the glute max) is the meatiest part of your butt and the largest muscle in your body. It’s a major contributor to walking, running, and jumping, and helps stabilize your hips and pelvis.
- Hamstrings: This group of three muscles is located on the back of your thigh, from your hip to just below your knee. They help straighten your hips at the top of the glute bridge and bend your knees as you return your hips to the floor.
- Calves: The calves consist of three muscles in the back of your lower leg. They activate to push your feet into the ground during the glute bridge.
Pros
The glute bridge is often considered a beginner glute exercise. “You’re lying on the ground, which limits the range of motion,” Stonehouse says. In other words, you can’t lift your hips very high during a glute bridge compared to a hip thrust, so your glutes don’t have to work as hard. This makes the glute bridge an effective way to ease into glute training.
Glute bridges are also ideal for those who work out at home or lack access to a variety of fitness equipment because you can do them anywhere you can lie flat on the floor.
Cons
While glute bridges are a great option for beginners, their limited range of motions means intermediate and advanced exercisers may not find them challenging enough to strengthen or grow their glutes.
Progressing glute bridges can be difficult. You can try single-leg glute bridges or add resistance with a band around your knees or a dumbbell on your hips. However, there comes a point when the resistance won’t be enough. “The glutes are very powerful muscles, so you can usually load up on the weight and push it just fine,” Stonehouse says.
Even using a barbell may not offer enough of a challenge. Depending on the size of the weight plates, you may need to lift your hips a few inches off the floor to even make contact with the bar, which means you won’t press the weight very far, Stonehouse explains.
“Both glute bridges and hip thrusts target the glutes, but the positioning and equipment are different.” —Ellen Thompson, CPT
Hip Thrusts
The hip thrust is another glute isolation exercise, though elevating your shoulders makes it more complex—and challenging—than the glute bridge.
“Because the shoulders are elevated on a box or bench, there’s a greater bend at the hips, resulting in a more significant stretch of the glutes due to the increased range of motion,” Ogden explains.
How to do them with correct form every time
Perform a proper hip thrust with these instructions from Ogden:

- 1.Grab a sturdy box or bench that’s knee-height (or slightly shorter). Place the box or bench against a wall or place a heavy weight behind it to ensure it doesn’t move during the exercise.
- 2.Sit on the floor facing away from the box or bench and bend your knees, placing your feet flat on the floor, about hip-width apart (or slightly wider). Inch yourself back toward the box or bench until you’re able to set your back (just under your shoulder blades) on the edge. Your glutes will be lifted off the floor.
- 3.Push into your feet to drive your hips up, keeping your gaze looking past your knees.
- 4.Squeeze your glutes and push your hips forward at the top while maintaining a neutral spine. Your torso should be parallel to the floor.
- 5.Release your hips toward the floor.
- 6.Repeat.
Beginners should start with three to four sets of 10 to 20 reps of bodyweight hip thrusts. Intermediate and advanced exercisers can incorporate resistance by adding a band around the knees or placing a barbell on top of the hips.
Muscles worked
Hip thrusts mainly work the glutes, but other muscles kick in to help with the movement.
According to Ogden, these are the primary muscles targeted in a hip thrust:
- Gluteus maximus: This is the main muscle involved in pressing your hips up during a hip thrust.
- Hamstrings: Your hamstrings help lift your glutes and return them to the starting position.
- Quadriceps: This group of muscles on the front of your thigh runs from above your knee to below your hip. Your quadriceps (also known as the quads) engage as you straighten your knees (even if they don’t lock out) and keep your knees aligned with your ankles during the exercise.
- Hip adductors: These muscles in the inner thigh help stabilize your hips as you press them up. Your hip adductors also contribute to walking, running, and jumping.
Pros
Because you elevate your shoulders, hip thrusts allow you to gain a greater hip range of motion, making them more effective for strengthening or growing your glutes. “Imagine doing a biceps curl and starting from a position where you’re 30 percent of the way there, versus going all the way down and all the way up,” Stonehouse says. Moving your muscles through that additional 30 percent range of motion only makes them stronger.
The ability to move through a greater range of motion also makes it easier to add resistance to hip thrusts, Stonehouse says. Many people opt for a barbell but you can also use free weights or bands. In any case, you have many options for making the hip thrust more challenging, so you keep seeing glute gains.
Cons
The hip thrust requires more effort to set up: You must find a box or bench and secure it so it doesn’t slide across the floor. If you’re using a barbell, you must set it up and situate it comfortably on your hips (many people use a barbell pad for cushioning). This complicated setup makes the hip thrust less accessible and approachable for many people, Stonehouse notes.
And, because the hip thrust is often performed with weight, proper form is even more crucial. You risk pain or injury if you get sloppy with your form or use more weight than you can lift with the correct technique.
Beginners, in particular, may want to start with more straightforward glute exercises such as the glute bridge, or hold off on hip thrusts until they’re able to work with a fitness professional who can show them the proper form.
Glute bridge vs. hip thrust: the bottom line
The glute bridge and hip thrust are two effective exercises for isolating the glutes. Both involve lying on your back and lifting your hips while keeping your feet flat on the floor, though glute bridges are performed on the floor and hip thrusts are done with your shoulders elevated.
Each movement offers perks, but the hip thrust is the better butt exercise.
“Extending the range of motion and adding weight increases your ability to get stronger,” Stonehouse explains.
Still, the glute bridge is effective and may be the ideal option for beginners and those with limited access to equipment.
Sign Up for Our Daily Newsletter
Get all the latest in wellness, trends, food, fitness, beauty, and more delivered right to your inbox.
Got it, you've been added to our email list.