Our editors independently select these products. Making a purchase through our links may earn Well+Good a commission

No matter how committed you are to keto, Paleo, Whole30, or whatever your eating plan of choice is, sometimes, you just can’t shake a craving for a sweet treat. Aussie Kenko Kitchen blogger Kate Bradley can relate. She loves living the healthy life, but doesn’t deny having a big sweet tooth. It’s why she wrote an entire cookbook full of recipes for treats that taste like dessert, but are loaded with protein, not sugar.
“I’m a serial snacker and knew there were a lot of people like me who want to eat healthily, but know a celery stick or a carrot stick doesn’t always hit the mark,” says Bradley. (Amen, sister.)
Her new cookbook, Bliss Bites, is filled with gluten- and dairy-free treats. The idea started with her her favorite bliss balls, sweet spheres of superfood ingredients (think: chocolate mixed with chia seeds, hemp, and bee pollen). Then, she began experimenting with natural sweeteners, alternative flours, and dairy substitutions to make new flavor combinations and homemade, healthy versions of her favorite candies.
It wasn’t always easy—a donut recipe in her book required at least 20 rounds of testing before she got it right—but she made some clever discoveries, such aquafaba (the juice from a can of chickpeas) which can be used as an egg replacement, for example, or using pureed dates as a natural sweetener that lends a complex, caramel-like flavor.
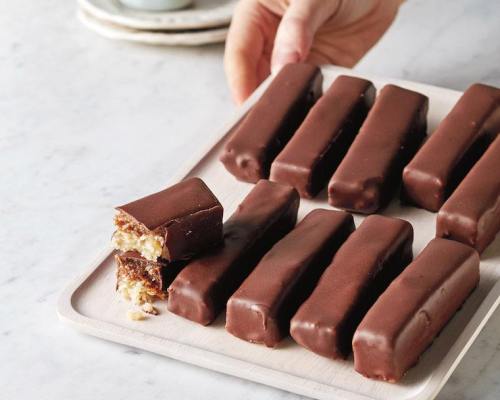
One of her favorite recipes in the book is this one for raw “Twix” bars. Bradley uses a cookie-like base of nuts and coconut, a “caramel” sauce from dates and nut butter and, of course, a dark chocolate coating.
“I have found they are one of the easiest ways to trick a sugar addict into having a plant-based treat,” says Bradley.
Try the no-bake Twix recipe below.
Raw “Twix” Bars
Makes 12 bars
Ingredients
For the base:1 cup raw cashews1/2 cup shredded coconut2 1/2 Tbsp ground almonds1/2 tsp vanilla extract2 Tbsp maple syrup
For the caramel:13 medjool dates, pitted1/4 cup maple syrup1/3 cup nut or seed butter1 tsp vanilla extract1 Tbsp mesquite powder (optional)Pinch sea salt flakes
For the chocolate coating:3 1/2 oz raw or dark chocolate, melted and cooled
1. Place all the ingredients for the base in your food processor and pulse until well combined.
2. Line the base of an 8×6-inch baking pan with parchment paper. Place the nut mixture in the tin, pressing it firmly and evenly over the base. Transfer to the freezer and freeze for about 30 minutes, or until firm.
3. To make the caramel, combine all the ingredients in the cleaned food processor and blend together until smooth. Remove the pan from the freezer and spread the caramel layer evenly over the base. Return to the freezer to set firm. Line a small tray with parchment paper.
4. Once the mixture is firm, remove the bar from the tin and cut into 12 even-sized fingers. (You can then cut these in half width-ways, to give 24 smaller fingers, if you like.) Dip the fingers into the melted chocolate, draining off any excess, and place them on the tray. Refrigerate or freeze until the chocolate has set then transfer them to an airtight container to store. These will keep, ideally frozen, for a couple of months. (Note that these go a bit soft in the fridge so freezer storage is best.)
Recipe excerpted with permission from Bliss Bites by Kate Bradley, published by Hardie Grant Books January 2018.
If you want more wholesome, homemade versions of classic treats to satisfy your sweet tooth, Check out Candice Kumai’s no-bake matcha cups or these adaptogenic doughnuts.
Sign Up for Our Daily Newsletter
Get all the latest in wellness, trends, food, fitness, beauty, and more delivered right to your inbox.
Got it, you've been added to our email list.


