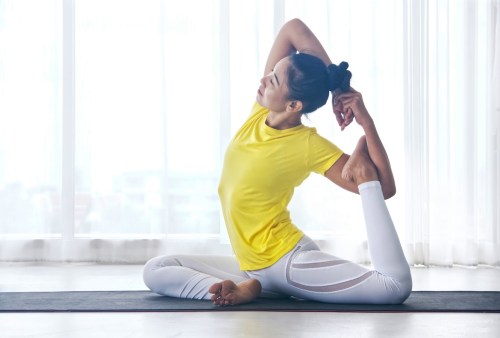
Mermaid pose (Eka Pada Rajakapotasana in Sanskrit) is a graceful and challenging yoga posture that beautifully combines flexibility, strength, and balance. It’s a deep hip opener that also targets your spine, chest, and shoulders, making it an all-encompassing pose for building strength and flexibility.
Experts in This Article
a yoga and movement teacher and the creator of Dance Flow Yoga
But starting from the ground up is key in mermaid pose, according to Heather Stants, a yoga and movement teacher and the creator of Dance Flow Yoga. Like any advanced yoga pose, it requires a thoughtful approach and proper preparation.
Ahead, we share exactly how to do mermaid pose, its benefits, ways to modify it or kick it up a notch, and more.
How to do mermaid pose the right way every time
Before diving into mermaid pose, it’s essential to warm up properly and approach the pose with mindfulness. Stants advises.
Time should be spent on lengthening the hip flexors and practicing back-bending postures, like camel pose (Ustrasana), before attempting the full bind in mermaid (where you link your hands together at the top of the move). Always listen to your body and respect your limits, she says.
- 1.Start in downward-facing dog (Adho Mukha Svanasana). Bring your right knee forward, placing it behind your right wrist while sliding your left leg back for pigeon pose (Kapotasana). Square your hips toward the front of the mat.
- 2.Press into your fingertips as you lift your chest, engaging your core and lengthening your spine before you settle back into your hips. Before moving on to the next step, ensure that your lower back feels comfortable here and your hips are not straining. If so, consider putting a block under the hip of your bent leg.
- 3.Slowly bend your right (back) knee, bringing your right heel toward your right gluteus muscle.
- 4.With your right hand, reach back and grab the inside of your right foot or ankle. Keep your chest open and your gaze forward.
- 5.Slide your right foot into the crook of your right elbow. If possible, reach your left arm overhead and clasp your hands together, creating a “mermaid tail” with your arms.
- 6.Once you’re in the full expression of the pose, this requires quite a bit of balance. Engage your core, but don’t forget to continue to breathe—if you start breathing shallow or rapid breaths, this may be a sign you’re not comfortable here.
- 7.Stay in the pose for five to 10 breaths, maintaining an open chest and square hips.
- 8.To exit the pose, release your foot and place your hands on the ground on either side of your front leg. Press yourself up into a one-legged downward-facing dog, and then back into a full downward-facing dog.
- 9.Repeat on the other side.
The benefits of mermaid pose
1. It opens up your hips and shoulders
Mermaid pose offers a deep stretch for your hip flexors, quadriceps, and shoulders, enhancing overall flexibility. Stants highlights that the pose helps with lengthening your hip flexors and making other back-bending postures more accessible, which is helpful preparation for more advanced postures.
2. It strengthens your core and back
The pose requires significant core engagement, helping to build stability and strength in your torso. A strong core translates to better posture, reduced risk of injury, and an easier time lifting and carrying heavy objects (think: groceries, moving boxes, etc.) in your everyday life.
3. It improves balance
Holding the pose demands focus and balance, which can improve coordination and stability in other yoga poses. Not to mention, it can make daily tasks like leaning over to tie your shoes, walking up and down stairs, and reaching up to grab something on the top shelf easier.
Tips to modify mermaid pose
1. Use a strap
If you can’t reach your foot with your hand, loop a strap around your back foot and hold onto the strap as you work on the flexibility needed to bind. This is one of Stants’s top recommendations to assist students struggling with flexibility.
- 1.Start in downward-facing dog. Bring your right knee forward, placing it behind your right wrist while sliding your left leg back for pigeon pose. Square your hips toward the front of the mat.
- 2.Press into your fingertips as you lift your chest, engaging your core and lengthening your spine before you settle back into your hips. Before moving on to the next step, ensure that your lower back feels comfortable here and your hips are not straining. If so, consider putting a block under the hip of your bent leg.
- 3.With a yoga strap wrapped around your right (back) foot, slowly bend your right knee, bringing your right heel toward your back gluteus muscle.
- 4.With your right hand, reach back and grab the inside of your right foot or ankle. Keep your chest open and your gaze forward.
- 5.Slide your right foot into the crook of your right elbow. If possible, reach your left arm overhead and grab the strap, meeting your right hand and creating a “mermaid tail” with your arms.
- 6.Once you’re in the full expression of the pose, this requires quite a bit of balance. Engage your core, but don’t forget to continue to breathe—if you start breathing shallow or rapid breaths, this may be a sign you’re not comfortable here.
- 7.Stay in the pose for five to 10 breaths, maintaining an open chest and square hips.
- 8.To exit the pose, release your foot and place your hands on the ground on either side of your front leg. Press yourself up into a one-legged downward-facing dog, and then back into a full downward-facing dog.
- 9.Repeat on the other side.
2. Keep your front leg at a wider angle
Instead of bringing your front shin parallel to the top of the mat, allow it to be at a more comfortable angle to reduce the intensity on your hips.
3. Skip the bind
You can perform a modified version of the pose by keeping your back leg bent and simply holding onto your foot with one hand, without binding with the elbow.
Mermaid pose variations
1. Mermaid pose with one-handed hold
For beginners or those with limited shoulder mobility, you can hold your back foot with your left hand without binding the foot into the elbow. Stants suggests this as a way to still benefit from the stretch while “gradually opening the shoulder.”
- 1.Start in downward-facing dog. Bring your right knee forward, placing it behind your right wrist while sliding your left leg back for pigeon pose. Square your hips toward the front of the mat.
- 2.Press into your fingertips as you lift your chest, engaging your core and lengthening your spine before you settle back into your hips. Before moving on to the next step, ensure that your lower back feels comfortable here and your hips are not straining. If so, consider putting a block under the hip of your bent leg.
- 3.Slowly bend your right (back) knee, bringing your right heel toward your right gluteus muscle.
- 4.With your right hand, reach back and grab the inside of your right foot or ankle. Keep your chest open and your gaze forward.
- 5.Once you’re in the full expression of the pose, this requires quite a bit of balance. Engage your core, but don’t forget to continue to breathe—if you start breathing shallow or rapid breaths, this may be a sign you’re not comfortable here.
- 6.Stay in the pose for five to 10 breaths, maintaining an open chest and square hips.
- 7.To exit the pose, release your foot and place your hands on the ground on either side of your front leg. Press yourself up into a one-legged downward-facing dog, and then back into a full downward-facing dog.
- 8.Repeat on the other side.
2. Mermaid pose with both hands
For those with advanced flexibility, clasp both hands behind your head, creating a deeper shoulder stretch. This variation intensifies the chest opening and challenges balance, making it a great progression for seasoned practitioners.
- 1.Start in downward-facing dog. Bring your right knee forward, placing it behind your right wrist while sliding your left leg back for pigeon pose. Square your hips toward the front of the mat.
- 2.Press into your fingertips as you lift your chest, engaging your core and lengthening your spine before you settle back into your hips. Before moving on to the next step, ensure that your lower back feels comfortable here and your hips are not straining. If so, consider putting a block under the hip of your bent leg.
- 3.Slowly bend your right (back) knee, bringing your right heel toward your right gluteus muscle.
- 4.With your right hand, reach back and grab the inside of your right foot or ankle. Keep your chest open and your gaze forward.
- 5.Reach your left arm overhead and grab the inside of your right foot or ankle.
- 6.Once you’re in the full expression of the pose, this requires quite a bit of balance. Engage your core, but don’t forget to continue to breathe—if you start breathing shallow or rapid breaths, this may be a sign you’re not comfortable here.
- 7.Stay in the pose for five to 10 breaths, maintaining an open chest and square hips.
- 8.To exit the pose, release your foot and place your hands on the ground on either side of your front leg. Press yourself up into a one-legged downward-facing dog, and then back into a full downward-facing dog.
- 9.Repeat on the other side.
3. Mermaid pose with a forward bend
While in mermaid pose, hinge forward from the hips over your front leg, increasing the stretch in your hip and adding a balance challenge.
- 1.Start in downward-facing dog. Bring your right knee forward, placing it behind your right wrist while sliding your left leg back for pigeon pose. Square your hips toward the front of the mat.
- 2.Press into your fingertips as you lift your chest, engaging your core and lengthening your spine before you settle back into your hips. Before moving on to the next step, ensure that your lower back feels comfortable here and your hips are not straining. If so, consider putting a block under the hip of your bent leg.
- 3.Slowly bend your right (back) knee, bringing your right heel toward your right gluteus muscle.
- 4.With your right hand, reach back and grab the inside of your right foot or ankle. Keep your chest open and your gaze forward.
- 5.Lean your torso forward as far as you can.
- 6.Once you’re in the full expression of the pose, this requires quite a bit of balance. Engage your core, but don’t forget to continue to breathe—if you start breathing shallow or rapid breaths, this may be a sign you’re not comfortable here.
- 7.Stay in the pose for five to 10 breaths, maintaining an open chest and square hips.
- 8.To exit the pose, release your foot and place your hands on the ground on either side of your front leg. Press yourself up into a one-legged downward-facing dog, and then back into a full downward-facing dog.
- 9.Repeat on the other side.
4. Mermaid pose with a straight binding arm
Kick your back leg straight while holding the foot, extending your arm for a deep chest and shoulder stretch. This variation opens your chest and intensifies the shoulder stretch, perfect for advanced practitioners seeking a deeper challenge.
- 1.Start in downward-facing dog. Bring your right knee forward, placing it behind your right wrist while sliding your left leg back for pigeon pose. Square your hips toward the front of the mat.
- 2.Press into your fingertips as you lift your chest, engaging your core and lengthening your spine before you settle back into your hips. Before moving on to the next step, ensure that your lower back feels comfortable here and your hips are not straining. If so, consider putting a block under the hip of your bent leg.
- 3.Slowly bend your right (back) knee, bringing your right heel toward your right gluteus muscle.
- 4.With your right hand, reach back and grab the inside of your right foot or ankle. Keep your chest open and your gaze forward.
- 5.Extend your right leg back as far as you can while still keeping your chest open and hips squared toward the front of the mat.
- 6.Once you’re in the full expression of the pose, this requires quite a bit of balance. Engage your core, but don’t forget to continue to breathe—if you start breathing shallow or rapid breaths, this may be a sign you’re not comfortable here.
- 7.Stay in the pose for five to 10 breaths, maintaining an open chest and square hips.
- 8.To exit the pose, release your foot and place your hands on the ground on either side of your front leg. Press yourself up into a one-legged downward-facing dog, and then back into a full downward-facing dog.
- 9.Repeat on the other side.
Common mistakes to avoid in mermaid pose—and how to fix them
1. Your hips aren’t aligned
Ensure your hips are squared toward the front of the mat. If they’re tilting to one side, use a yoga block under the hip of your front leg to level them. Stants reminds students that “the bind is so tempting,” but warns against sacrificing alignment for the sake of getting into the bind too quickly.
2. You force the bind
Don’t rush into the bind. If your shoulder or hip flexibility isn’t there yet, focus on the preparatory steps and use props to support your progress.
3. You over-arch your lower back
Engage your core to avoid collapsing into your lower back. Think about lengthening your spine rather than simply bending backward.
Who mermaid pose is best for (and who should avoid it)
Mermaid pose is best for:
- Experienced yogis with a solid foundation in hip-opening and back-bending postures.
- Those looking to increase flexibility in their hips, shoulders, and spine.
Avoid mermaid pose if:
- You have knee, hip, or lower back injuries, as the pose can place pressure on these areas. Stants cautions that “someone with a low back, hip, or knee injury might want to avoid practicing mermaid,” due to the deep stretch and binding required.
- You’re pregnant or have shoulder instability, as the binding aspect can be challenging and potentially unsafe.
Sign Up for Our Daily Newsletter
Get all the latest in wellness, trends, food, fitness, beauty, and more delivered right to your inbox.
Got it, you've been added to our email list.
