The 1 Trick That Can Make These 5 Popular Yoga Poses More Effective
Ever wonder about the proper head position in yoga for poses like downward dog or cobra pose? A yoga teacher explains exactly what to do.
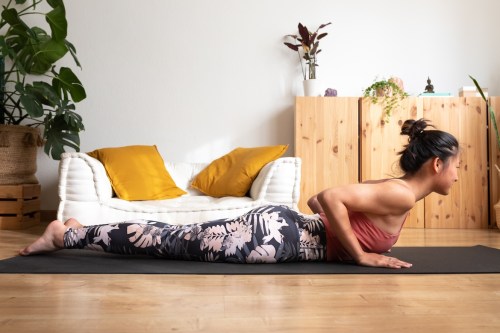
Have you ever done certain yoga poses and felt like you just weren’t doing them “right?” Or, to put it another way, not as effectively as you could be?
Experts in This Article
a registered yoga teacher and writer
Second only to a smooth, steady breath, proper physical alignment can unlock the full potential of pose to make even the most challenging ones feel somewhat effortless.
One body part we often forget about is our head. As a yoga teacher, with more than seven years of experience under my belt, I’ve noticed many people are unaware of how big an impact properly aligning—or misaligning—their head in a pose can make on the overall experience.
Keep in mind that misalignments don’t mean you’re doing anything “wrong”—alignment isn’t about doing a pose perfectly because, spoiler alert, there’s no such thing. Alignment principles are guidelines we use to place ourselves with intention and awareness in every posture so we feel balanced, supported, and most of all, connected to our breath.
Unless you’ve watched yourself practice in a mirror or been corrected by an attentive yoga teacher, you can’t see these misalignments—however, you can certainly feel the major difference of these tiny adjustments.
Get out of your head and into your body with this one alignment cue—repositioning your head—that will make these five popular yoga poses more effective.
1. Downward dog (Adho Mukha Svanasana)
If you’re experiencing overstretching, discomfort, or pain in your back on a regular basis, it could be a symptom of a consistently rounded upper spine—or “text neck,” if you will.
Doing downward dog can help. In this pose, gravity works to create a wonderful stretch for your entire body with a gentle decompression for your spine that counteracts the not-so-positive effects of sitting for hours on end each day.
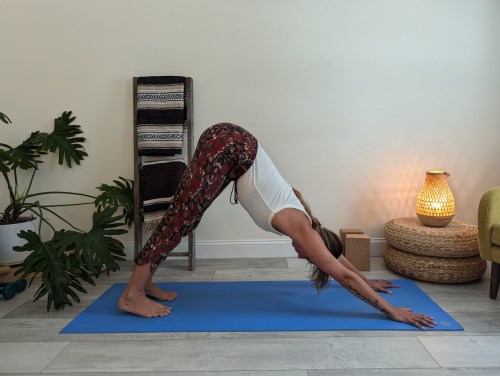
When you get into downward dog, do a quick check to notice the position of your head: Is your chin tucked in toward your chest? If the answer is yes, try gently lifting the back of your head to bring your ears in line with your arms. This small adjustment can make a world of difference and reposition the rest of your spine so you feel that full-body stretch this pose is famous for.
Correct downward dog position:
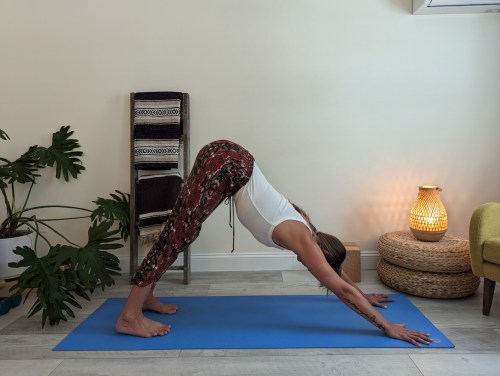
- 1.Begin in a tabletop position on your hands and knees with your wrists under your shoulders and your knees under your hips.
- 2.Curl your toes under and press through your hands and toes to lift your knees away from the floor.
- 3.Extend your arms while lifting your hips up and back. Your body should form an inverted “V.” Actively stretch your hands and hips away from one another to keep your spine long.
- 4.Notice the position of your head, and if necessary, gently lift the back of your head without craning your neck forward, so your chin stays parallel to your chest and your spine is long.
- 5.Remain here for 3 to 5 breaths, then slowly lower down to the starting position.
Incorrect downward dog position:
2. Cobra pose (Bhujangasana)
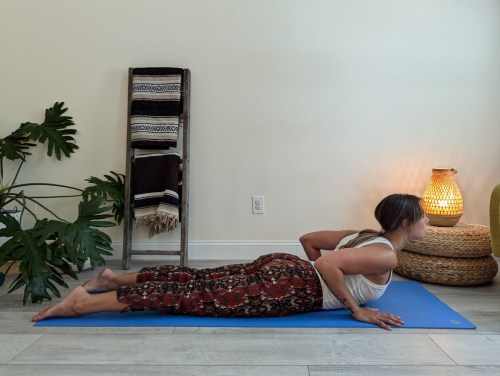
This popular belly-down backbend is an easy culprit of overdoing it in your head and neck simply because much of the action happens in your upper body.
The common misalignment in cobra pose is starting the backbend by thrusting your chin up and away from the floor to open your chest. However, in doing this, you run the risk of putting too much pressure on our neck—ouch! Plus, you break the golden rule of backbends, which is to make length and space first.
A quick reposition of your head solves this issue—begin with your gaze down toward your mat, keeping that overeager chin parallel to your chest until the very last moment, when your head, neck, and chest all open up into a safe, spacious backbend together. This way, you won’t compromise the health of your neck and you’ll strengthen your back muscles.
Correct cobra pose position:
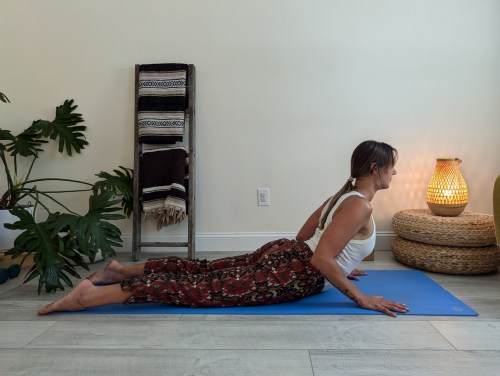
- 1.Begin lying down on your belly with your hands beneath your shoulders and forehead on your mat. Extend your legs behind you.
- 2.Inhale to lengthen your spine, and exhale to slowly lift your head, neck, and chest off the mat with your chin parallel to your chest.
- 3.Continue lifting your upper body off the mat, gently pressing down into your hands, with your outer arms hugging in toward your body.
- 4.When you can’t lift any higher, inhale to lift your chin up, opening your throat and gazing straight ahead.
- 5.Remain here for 3 to 5 breaths, then slowly lower down to the starting position.
Incorrect cobra pose position:
3. Warrior II (Virabhadrasana II)
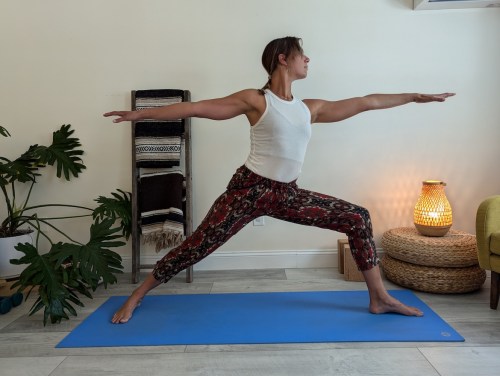
One of the most common alignment mistakes in warrior II actually has nothing to do with your head at first. The movement pattern is this: As soon as your arms stretch wide, your torso turns forward and you may end up reaching too far forward, which unintentionally puts you into a twist and brings your head off center as you crane your neck forward.
However, warrior II isn’t meant to be a twist at all. Whether it’s a symptom of anxiously anticipating the next move or simply being unaware of what’s happening, I love to offer this correction and watch students realign themselves into a different version of the pose that helps them achieve a balance of both strength and openness.
Correct warrior II position:
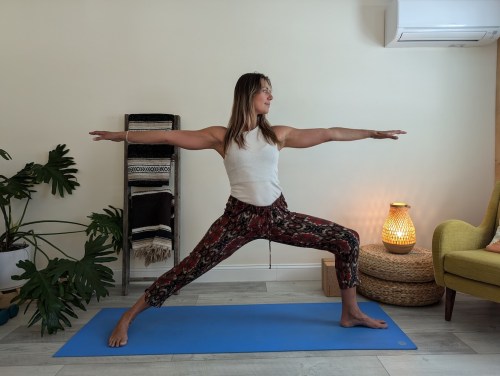
- 1.Start in a standing position on your yoga mat, feet hip-width apart, grounding yourself and standing tall.
- 2.With a deep breath, step one foot back about three to four feet. Turn this foot out to about a 90-degree angle, ensuring your feet are aligned heel to heel.
- 3.Bend your front knee, aligning it directly over your ankle. Your front thigh should be parallel to the floor.
- 4.Place your hands on your hips and gaze straight ahead, aligning your head over your spine with your torso centered between your legs.
- 5.Inhale to elongate your spine and stretch your arms out from front to back.
- 6.Exhale and turn your head to gaze forward over your front middle finger.
- 7.Remain here for 3 to 5 breaths, then slowly lower down to the starting position.
- 8.Repeat on opposite side.
Incorrect warrior II position:
4. Triangle pose (Utthita Trikonasana)
A dynamic foundational pose that’s great for seasoned yogis and beginners alike, triangle pose is a relief for cranky (read: tight) hamstrings, and it thoroughly stretches your back, too.
Yet, many people don’t notice their head is drooping down, overstretching the side of their neck, and most of the time with their head turned up toward the ceiling. This can create a ripple effect through the body that makes the pose harder than it needs to be and not so awesome for the neck.
Simply realigning your head with the rest of your spine and keeping your gaze straight ahead, rather than up, makes it easier to breathe and creates more of an effortless stretch when your spine isn’t trying to counteract the weight of your head.
Correct triangle pose position:
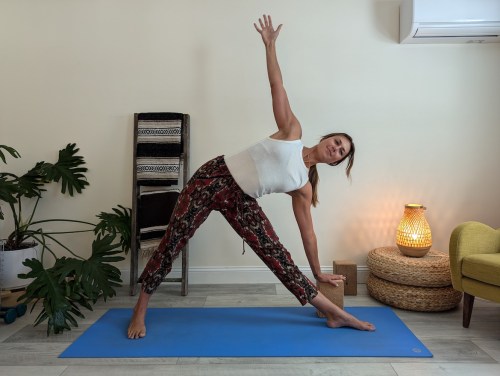
- 1.Begin standing in the center of your yoga mat and step your feet about 4 feet apart from each other. Place your hands on your hips.
- 2.Point your right foot to the long edge and point your left foot toward the top of the mat. (You can place a yoga block outside your front ankle if you feel very tight in your hamstrings.)
- 3.Gaze straight ahead, aligning your head over your spine with the torso centered between your legs.
- 4.Inhale to elongate your spine and stretch your arms out wide.
- 5.Exhale as you bend forward and place your bottom hand on the yoga block, the mat, or lightly on your ankle.
- 6.With your gaze straight ahead, reach the crown of your head forward to keep stretching through your spine without letting your head drop.
- 7.Remain here for 3 to 5 breaths, then slowly lower down to the starting position.
- 8.Repeat on the opposite side.
Incorrect triangle pose position:

5. Corpse pose (Savasana)
Theoretically, lying down on the floor should feel good. But that’s not always the case for some people when they practice corpse pose.
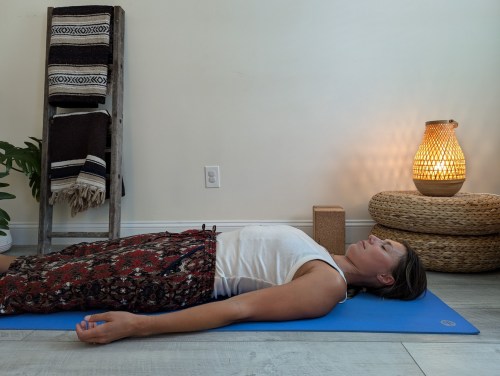
Adding props for comfort or realigning your body so you feel at ease can be helpful, and a simple way to relax more deeply into this posture is with a slight repositioning of your head and neck.
If you have your chin tucked in toward your chest or jutting upward, this exaggerates your neck’s natural curve and can make it hard to relax. Making a minor head adjustment can unlock a world of good for the rest of your spine and quiet down your mind.
Correct corpse pose position:
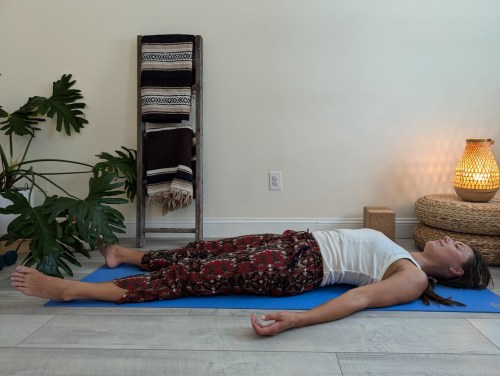
- 1.Begin lying on your back with your arms and legs extended equidistant from your body.
- 2.Slide your fingers underneath your head slightly above the base of your skull, where the bones feel slightly flat.
- 3.Inhale and gently lift your head an inch off the mat, keeping your spine long. As you exhale, place the flat part of the back of your head down on your mat so your neck is in a neutral position.
- 4.When you feel comfortable, remain here for anywhere from 5 to 20 minutes.
Incorrect corpse pose position:
Sign Up for Our Daily Newsletter
Get all the latest in wellness, trends, food, fitness, beauty, and more delivered right to your inbox.
Got it, you've been added to our email list.
