Our editors independently select these products. Making a purchase through our links may earn Well+Good a commission
When Melissa Sharp was diagnosed with breast cancer at 36, her boyfriend—now business partner—helped her overhaul her diet. Organic green juices, probiotics, and grass-fed meat were in; sugar, dairy, and processed foods were out. “I changed my diet and my whole approach to life but I always loved baking, tweaking recipes, lowering the sugar, increasing the fiber, or using different grains,” says Sharp, who opened Modern Baker, a booming “long fermented” bakery in Oxford, London.
So, what the heck is long fermentation? In a nutshell, it’s baking breads and other baked goods using a true sourdough starter that relies on yeast that occurs naturally versus commercial yeast, which Sharp’s bakery doesn’t. (They also are committed to not using any refined sugars and only stone-ground, pre-industrialized grains.)
“When you make long fermented bread, it doesn’t spike blood sugar, and has more magnesium, zinc, iron and B12 in it,” says Sharp, who co-authored Super Loaves and Simple Treats, a collection of mouthwatering recipes for breads, buns, cakes, cookies and more, with her head baker, Lindsay Stark.
How it works is pretty simple: The friendly bacteria used in Modern Baker’s breads and baked goods eat the sugar in the dough, reducing the total amount of sugar you actually consume and, at the same time, beginning to break down the gluten in the bread. As a result “it’s much easier to digest,” says Stark, cautioning that while many of their gluten-intolerant customers can enjoy their breads without problem, it’s still not suitable for people who have celiac disease.
If making your own sourdough starter at home sounds like a non-starter (lol) don’t be intimidated, says Stark. “People don’t realize how resilient the sourdough starter is. I’ve left it in the fridge for months on end. They really are very resilient and once you’ve got one going, you can just take it out when you need it.”
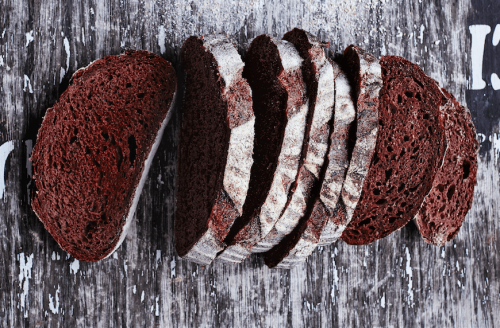
Interested in making your own long-fermented bread at home? Keep reading to get the recipe for beet and sauerkraut sourdough.

Beet and sauerkraut sourdough
Makes 1 loaf
“Its got a bit of a bite to it. It’s a bit more acidic and salty,” says Sharp. The duo say the earthy flavor in the bread makes it work really well in sandwiches and avocado toast. They also recommend using high-quality raw sauerkraut that you buy from the refrigerated section of the grocery store and, when making the bread, “drain the sauerkraut well, or the dough will be too slack and the acidity of the juice could affect the gluten development.”
Ingredients
Day 1: To make the wheat starter:
1 tsp white bread flour1 tsp warm water (90 to 99°F)
Day 2:Wheat starter made on Day 11 tsp white bread flour1 tsp warm water, (90 to 99°F)
To make the recipe starter:
8 1/2 Tbsp white bread flour5 Tbsp warm water (90 to 99°F)Active wheat starter (above)
To make the bread:
5 1/2 oz. recipe starter from previous day12 oz. raw beet, peeled and pureed3 1/4 cups white bread flour1 1/2 Tbsp Himalayan pink salt3 1/2 oz. raw sauerkraut, drained of as much liquid as possible
Day 1: To make the wheat starter
1. Mix together the flour and the water in a container with a lid. Mixing with your hands will work better than with a spoon. Everyone has naturally occurring yeast on their hands, so this can give your starter a real boost. Leave the mixture overnight at room temperature.
2. Cover it with the lid but do not make it airtight. A screw-top jar with the lid partly done up is perfect. You want the yeasts in the air to get in, but you also want to prevent the mixture from drying out.
Day 2
1. Throw away half of the mixture from Day 1. This is because you want to almost overwhelm the bacteria/yeast in the starter with food, by adding more flour than the weight of the original mixture. You could do this by adding more flour and warm water and not throwing any away, but you would very quickly end up with an excessively large amount of starter.
2. Stir the flour and water into the remaining mix and leave again at room temperature overnight.
Days 3 and 41. By now you should notice your starter has bubbles in it. This means it is ready. Don’t worry if it smells acidic or cheesy, this is completely normal and each starter will create its own unique fragrance. Now you have your own living, bubbling jar of healthy microbes that you’ll be using for years to come.
2. If the starter isn’t obviously bubbling, keep repeating Day 2 until it does bubble. Quite a few factors can affect how long it take starter yeast to activate, temperature being one of the main ones. If you begin your starter in cold conditions it may take longer to get going.
To make the recipe starter
1. Mix the flour and water with the whole quantity of the starter and leave loosely covered at room temperature overnight.
To make the bread
1. In a large bowl, combine the recipe starter with the beet puree and mix gently.
2. In another bowl, combine the flour and the salt.
3. Add the flour mix to the first bowl and mix using one hand until a dough forms. This takes only a couple of minutes. It’s a good idea to use only one hand, leaving the other one clean for using utensils. Use a plastic dough scraper around the bowl to make sure all the flour is mixed in. Cover the bowl with a shower cap or damp dish towel and let it rest.
4. After five to 10 minutes, give the dough a fold in the bowl. Use slightly wet hands to prevent the dough sticking to them. Pull a section of the dough out to the side and fold it into the middle of the ball. Repeat this going around the ball of dough until you get back to the beginning (four or five folds). Use the scraper to turn the dough upside down, cover the bowl, and leave for another five to ten minutes. Repeat this two times. For the third and final fold, add the drained sauerkraut to the dough and fold well so that it is evenly distributed throughout. After the final fold, cover the bowl again and let rest for one hour.
5. Turn the dough out of the bowl onto a lightly floured counter. Stretch out one side of the dough and fold it into the middle. Repeat this with each of the four “sides” of the dough. Put the dough back in the bowl upside down and let rest for another hour.
6. Shaping a long rustic loaf: Turn the dough out onto a lightly floured counter and stretch it out into a long, flattened oval shape, using both hands. Take one end of the dough and fold it into the middle. Repeat with the other end, so that the dough now resembles a rectangle. The two ends should overlap a little in the middle. Pull and fold the top of the rectangle in toward you so that it covers a third of the way down. Tuck the dough in with your thumbs. Repeat this until you have a sausage shape. Roll it to tighten it slightly and make the shape as even as possible.
7. Lightly flour an oval proofing basket and place the dough in it with the seam facing up and the smooth side on the bottom.
8. In the bakery at this point, Sharp puts the dough in her cool retarder cabinet for it to proof slowly overnight. This helps it to develop more flavor and become even healthier as it “predigests” more of the gluten and ferments even more probiotic qualities. Your version of their retarder is your refrigerator—and you can leave the proofing basket in it overnight, covered with the dish towel or shower cap. Take it out as you are heating the oven. It’s fine for it to go in cold. However, if you would prefer to speed things up a little, at this stage you can simply leave the dough in a warm place (ideally 75°F) until it has more or less doubled in size. This should take two to four hours. To test when the dough has proofed enough, press your finger about a couple inches into it, then remove. If the dough pushes back out slowly it is ready. If it springs back quickly it is under-proofed. If it doesn’t spring back at all, it is over-proofed. There isn’t much you can do about that. The bread will be edible, but more liable to collapse.
9. Preheat the oven to 480°F or the highest temperature on your oven. Place a roasting pan in the bottom of the oven to heat up. Fill a cup with water and place to one side ready to use. Also put a flat baking sheet in the oven to heat up.
10. When the oven is up to temperature, take the hot baking sheet out, lightly dust it with flour, and then turn the dough from the proofing basket out onto the sheet. Slash the dough with a sharp knife. Make sure that when you slash you use one quick, smooth action; do not saw at the dough. This will give you a much cleaner line.
11. Place the baking sheet in the oven and pour the glass of water into the preheated roasting pan. The moisture from this makes the dough lighter, helps to set the crust, and gives it a lovely sheen.
12. Turn the temperature down to 465°F and bake for approximately 40 minutes. To check if the bread is baked through, tap the bottom—it should sound hollow.
13. Let the bread cool for at least an hour before eating. If you eat it when it’s still hot, it will not have settled and so will be more difficult to digest.
Reprinted from Super Loaves and Simple Treats by arrangement with Avery, an imprint of Penguin Publishing Group, a division of Penguin Random House LLC. Copyright © 2018, Melissa Sharp.
If you’re looking for more intel on how to make healthier breads and baked goods, check out this piece on a female baker selling fermented breads in Los Angeles and this gluten-free guide to baking like a pastry chef .
Sign Up for Our Daily Newsletter
Get all the latest in wellness, trends, food, fitness, beauty, and more delivered right to your inbox.
Got it, you've been added to our email list.


